Use the following format to cite this article:
Preventing tractor overturn incidents. (2024). Ag Safety and Health eXtension Community of Practice. Retrieved from https://ag-safety.extension.org/preventing-tractor-overturn-incidents/.
Tractor overturn incidents can result in major injuries (crushing injuries, broken bones, and so on) and even death. The first step in preventing an injury or death is to make sure that your tractor is equipped with a rollover protective structure (ROPS) that, if used in conjunction with a seat belt, keeps the operator in a protective zone in the event of a rollover incident. Most rollover incidents can be prevented by understanding the causes of overturns and following safe operating practices.
There are two types of tractor rollover incidents: side and rear overturns.
Side Overturns

(Source: Pennsylvania State University, Ag Safety & Health)
Side overturns are the most common type of tractor overturn incident. In a side overturn incident, a tractor rolls onto its side. Preventing this type of incident is possible if the operator understands specific hazards and knows the appropriate time to apply safety precautions.
The two major factors at play in side overturn incidents are center of gravity and centrifugal force. The center of gravity (sometimes referred to as CG) is the location where all of the tractor’s weight is equally balanced. This point can change due to attachments and weight from a load, as when material is carried in a front-end loader. The center of gravity must remain within the tractor’s stability baseline for the tractor to remain in an upright position. A tractor’s stability baseline is found by drawing lines between the tractor’s four tires where the tires touch the ground. Centrifugal force is the force that pushes out on a tractor as the tractor makes a turn. (Click here to link to an eXtension article on tractor stability.)
Ways of preventing a side rollover incident include, but are not limited to, the following:
- Braking properly
- Avoiding shear line hazards
- Keeping buckets low during transport
- Driving at appropriate speeds
- Using caution on sloped areas
Braking Properly
Before driving at transport speeds, lock the brake pedals together to provide even brake pressure. If you do not lock the brake pedals together and use only one brake pedal, the tractor could swerve and potentially roll over. When traveling with a load down a steep hill, shift your tractor to a lower speed before you begin your descent so that the engine does the majority of the braking.
Avoiding Shear Line Hazards
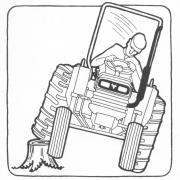
The soil on a bank or the shoulder of a ditch can be weak due to patterns of freezing and thawing or prolonged wet weather. Weak soil can collapse under pressure. The point at which soil is vulnerable to collapse is called a shear line. A shear line hazard exists when large vehicles such as combines operate close to a bank, putting pressure on soil inside the shear line and putting the vehicle at risk should the soil collapse. To avoid this overturn risk, drive your tractor as far back from the edge of the ditch or bank as the ditch is deep (see below). Maintain more distance for tractors pulling wide tillage or planting equipment (should a collapse occur under such equipment, the equipment could pull over the tractor or combine). When operating your tractor near a ditch or bank, always keep your tractor behind the shear line.

(Image Source:Safety Management for Landscapers, Grounds-care Business, and Golf Courses, John Deere Publishing, 2001. Illustration reproduced by permission. All rights reserved)
Keeping Buckets Low during Transport
Always keep the bucket of a front-end loader as low as possible during transport. A loader’s center of gravity in relation to the stability baseline changes drastically when the bucket is too high, especially on sloped areas, placing the loader at risk for an overturn.
Driving at Appropriate Speeds
Drive at a speed that is appropriate for a the given road or environmental conditions because increased speed reduces the stability of the tractor. By going at a slower speed, you will have greater time to spot obstructions in the path of the tractor and maintain better traction with the road (see below). It is also important to decrease your speed when you are pulling rear-mounted equipment to maintain stability.
(Source: Pennsylvania State University, Ag Safety & Health)
Using Caution on Sloped Areas
Do not drive your tractor across steep slopes because the risk of a tractor overturn increases as the angle of the slope increases. If a task must be completed on a steep slope, use a tractor that has a wide front end and rear tires that are spaced as far apart as possible. When possible, back the tractor up a steep slope rather than driving uphill. When going down a steep hill, never travel at a speed faster than the speed you used going up. Centrifugal force is a significant factor when turning on slopes. When you need to make a turn while traveling on a steep slope, reduce your speed and turn downhill rather than uphill.
Pay close attention to any bumps or depressions when driving on a sloped surface, and keep your speed low when traveling on a sloped area. If you are using a side-mounted attachment on your tractor, make sure that the piece of equipment is on the uphill side of the tractor.
Rear Overturns
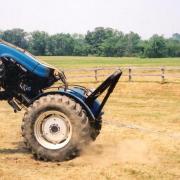
Rear Tractor Overturn Demo
(Source: Pennsylvania State University, Ag Safety & Health)
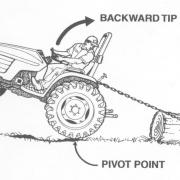
Rear overturns occur when the front end of a tractor flips backward, landing the top of the tractor on the ground. The incidents are dangerous because they happen very quickly. A tractor typically reaches the “point of no return” in less than a second, and the entire rear rollover incident can occur in one and a half seconds. This gives the operator little to no time to react to the situation.
A critical factor involved in rear rollover incidents is rear-axle torque. When the clutch is engaged on a two-wheel tractor, a twisting force (torque) to the rear axle results. This force is transferred to the tractor tires. Normally the rear axle and tires rotate and the tractor moves. However, if the rear axle is unable to move in response to the torque, the tractor chassis rotates about the axle. This energy transfer between the engine and the rear axle can result in the front-end of the tractor lifting off the ground until the tractor’s center of gravity passes the rear stability line. Once the center of gravity passes this point, the tractor continues rearward until it comes in contact with the ground.
Tractors with four-wheel drive are less susceptible to rear overturns because torque is applied to both the front and rear axles, and the center of gravity is moved forward because more weight is carried on the front axle. However, there is little difference between a two- and four-wheel drive tractor once the front end of the tractor begins to lift.
Operators face an increased risk of rear overturn in the following situations:
- Freeing a stuck tractor
- Raising rear-mounted equipment
- Using a front-end loader
- Hitching above the drawbar
- Operating on an incline
Note that this list is not comprehensive.
Freeing a Stuck Tractor
On occasion, tractors become stuck in mud or in frozen ground. When this happens, first try to free the tractor by backing out. To aid in this process, you may need to dig dirt or mud from behind the rear wheels and unhitch equipment. If you are unable to back out, enlist the help of another tractor to pull the stuck tractor out from behind. If this is not possible, use the other tractor to pull the stuck tractor out from the front. When trying to free a stuck tractor, never place boards or blocks in front of the rear wheels because the wheels could suddenly catch and stop turning, possibly causing the tractor to rear up and tip backwards.
Raising Rear-Mounted Equipment
Add front-end weight to counteract the weight from raising heavy rear-mounted equipment.
Using a Front-End Loader
If you are installing a front-end loader, always use a loader designed specifically for your tractor. When moving materials in a front-end loader, the tractor becomes heavy toward the front, placing it at risk for an overturn incident. Due to the added weight from the loader and materials, you may need to add rear counterweights to the tractor or liquid ballast in the rear tires. Rear overturn incidents can be reduced by keeping the loader bucket as low as possible when transporting materials, especially when operating on a sloped area.
Hitching above the Drawbar
The risk of a rear overturn incident increases when you hitch above the tractor drawbar, which is specifically designed and located to pull loads. When you hitch to a location other than the drawbar (see below), you raise the angle at which the load pulls down and back, reducing the safety design of the tractor and increasing your risk of an overturn.
(Image Source:Safety Management for Landscapers, Grounds-care Business, and Golf Courses, John Deere Publishing, 2001. Illustration reproduced by permission. All rights reserved)
Operating on an Incline
When pulling something up a hill with a tractor, both the slope and the pull on the drawbar make the tractor less stable. During operation, it is important to smoothly operate the clutch and throttle. Avoid stopping or shifting gears while on the hill because extra power is needed to restart the tractor and the tractor could drift backwards.
Resources
Click HERE to be directed to the Canadian Agricultural Safety Association website, where you can review actual tractor incidents and identify causes and safe operating procedures.
For more information about safe tractor operation and hazards, click on a title below to be directed to the article:
Power Take-Off Safety
Preventing Tractor Runover Incidents
Rollover Protective Structures
Use the following format to cite this article:
Preventing tractor overturn incidents. (2024). Ag Safety and Health eXtension Community of Practice. Retrieved from https://ag-safety.extension.org/preventing-tractor-overturn-incidents/.
Sources
Agricultural tractor safety. (2011) Safe Workplace Promotion Services Ontario. No longer available online.
Baker, D. (2021) Safe tractor operation. University of Missouri Extension. Retrieved from https://extension.missouri.edu/publications/g1960.
Murphy, D. (2022) Tractor stability and instability. Penn State Extension. Retrieved from https://extension.psu.edu/tractor-stability-and-instability.
Smith, D. (2010) Safe tractor operation: Rollover prevention. Texas A & M System AgriLIFE Extension. Retrieved from http://agsafety.tamu.edu/files/2011/06/SAFE-TRACTOR-OPERATION-ROLLOVER1.pdf.
Tractors: Roll-over prevention. (2002) Canadian Centre for Occupational Health and Safety. Retrieved from http://www.ccohs.ca/oshanswers/safety_haz/tractors/rollover.html.
Reviewed and Summarized by:
Linda M. Fetzer, Pennsylvania State University – lmf8@psu.edu
Tom Karsky, University of Idaho (Has since retired)
Dennis J. Murphy, Pennsylvania State University (Has since retired)