Print, video, and webinar resources are valuable to agricultural producers, agricultural educators, agricultural safety and health professionals, and Cooperative Extension personnel. In addition to the resources available on eXtension and through the Ag Safety and Health Community of Practice in eXtension site, there are additional agricultural safety and health resource available through universities and organizations. The following information provides links to available video publications (2000 and newer) from universities and agricultural safety and health organizations. Topics are listed below. Click on the topic to be linked to the article where the individual resources links are located by category.
Gearing Up for Safety is an outcomes-based instructional program developed to provide training for youth seeking employment in agricultural production. It was designed both for youth living on family farms and for 14- and 15-year-olds who want to be certified under the provisions of the Agricultural Hazardous Occupations Order (AgHOs) to perform certain work activities on a farm operation. AgHOs is a set of federal safety and health standards that classify certain tasks as hazardous for youth under the age of 16. By participating in Gearing Up for Safety, youth are able to meet the AgHOs training requirements for operating a tractor of more than 20 horsepower, connecting and disconnecting implements, and operating certain farm machines.
Gearing Up for Safety is intended for national use through the Cooperative Extension Service and agricultural education programs, both of which are specifically identified by AgHOs as authorized to conduct AgHOs certification training.
Curriculum
The Gearing Up for Safety program includes a Program Leaders’s Guide (CD-ROM) that provides instructors with tools for organizing and conducting an agricultural safety training program that meets the requirements of AgHOs and addresses the most frequent causes of injuries and fatalities to youth in agriculture. The program also includes a student CD-ROM consisting of 11 units that allows students to execute certain aspects of the training independently. The curriculum is also supported by an extensive website. (Click here to be directed to the Gearing Up for Safety website.)
The Program Leader’s Guide includes the following components:
Suggested teaching aids
Core competencies that each student should master
Graphics for presenting key points
Lesson outlines with supplemental background information
Activity worksheets
Review test questions
PowerPoint presentations
Examples of farm injuries for classroom discussion
Evaluation tools
These evaluation tools assess students’ knowledge of material, ability to perform preoperational safety inspections, and ability to safely maneuver a tractor through a standardized obstacle course.
Program materials are available online and for purchase as CD-ROMs:
Personal protective equipment (PPE) is important for agricultural producers to reduce their risk of injury or death. Most eye injuries can be prevented by wearing the appropriate PPE.
Injuries to the eye can be expensive, painful, and may cause partial or total blindness. Proper eye protection is the best strategy in preventing eye injuries because most eye injuries are a result of flying particles. The eye has its own built-in protection from the surrounding bone structure, eyelashes, tearing, and blinking; but they are no match for particles entering the eye at a high rate of speed. Eye protection should be worn when completing the following types of jobs: feed grinding, handling chemicals, haying, welding, repairing equipment, and any task completed in a dusty environment.
Types of Eye Protection
There are 5 types of eye protection. Choose the type that best suits your vision and provides the best protection for the job that you are completing.
Basic Safety Glasses
(Source: Pennsylvania State University. Agricultural Safety and Health)
A pair of basic safety glasses provides protection when there is potential for particles to enter the eye from the front. Safety lenses in regular eyeglass frames are not considered suitable safety glasses. Most basic safety glasses do not provide side protection, but side protection is available on some safety glasses through either permanent or detachable side shields to protect the eye from above, below and on the sides. When choosing safety glasses with side protection, make sure that the sides do not interfere with your peripheral vision.
Prescription Safety Glasses
Prescription safety glasses are made of either plastic or metal and are available in both bifocals and tinted lenses. Use caution when choosing tinted lenses because these lenses take time for the tinting to disappear which can be hazardous when frequently going between inside and outside work areas. Choose tint lenses when activities may include bright flashes of light.
Goggles
Goggles provide inexpensive protection from all angles because they fit snugly around the eyes. This type of eye protection is especially good for jobs such as chainsaw operation, grinding, and riveting. Goggles are especially useful because they typically fit over most prescription eyeglasses and are usually ventilated with an anti-fog solution. Two of the most common models of goggles are eyecup or wire mesh. If working around chemicals, choose goggles with off-set ventilation ports.
Face Shields
Face shields are secondary protection and must be worn in conjunction with either glasses or goggles. This type of eye protection is especially designed to protect the user from heat, glare, and flying objects. Face shields can be attached to hard hats for those jobs that also require head protection.
Welding Helmets and Goggles
Welding Helmet. Photo source: Penn State University
A welding helmet is equipped with special filtering lenses that protect the eyes from the strong ultraviolet and infrared rays that can permanently damage eyes and cause blindness. Welding goggles have various filter lens shades to protect against sparks, rays, and flying particles. Talk with your local dealer to determine the filter lens shade that you need for the various types of welding. Stationary or lift-front lenses are available for both welding helmets and goggles.
Standards for Eye Protection
ANSI and ISEA standards for eye protection are determined based on the identified hazard in the workplace. Lenses that are ranked as basic are designated as Z87, but high impact lenses have a Z87+ designation.
Additional recommendations concerning eye protection include the following:
Do not share eye protection to reduce the risk of contracting a contagious eye disease from another worker.
Even though sunglasses are important for working outdoors, they are not considered to be eye protection.
Maintenance of Eye Protection
Regularly clean your protective eyewear in warm, soapy water because looking through dirty lenses can strain your eyes. Use a soft tissue or cloth to dry the lenses to reduce the risk of scratches because deep scratches or pitting may weaken the lenses. Goggles should fit snuggly over your eyes so replace elastic goggle headbands when they become stretched. Store your protective eyewear in a rigid case to reduce dust build-up and potential damage to delicate parts.
Maintain proper vision by having your eyes examined annually. Vision changes can occur that may require a prescription change or the need for prescription eye protection. If you wear contacts, always wear protective eyewear in work areas. The recommendation is to wear prescription eye protection instead of contacts especially in dusty environments because contact lenses may trap particles in the eye.
First Aid for Eye Injuries
The following chart outlines the first aid response to different eye injuries:
Type of Injury
Proper Treatment
Actions to Avoid
Foreign particle in the eye
Flush the eye with water until the object rinses out. If unable to flush the particle out, cover the eye and seek medical attention.
Do not rub your eye because your eye could be scratched or embed the object.
Object embedded in the eye
Bandage both eyes and seek medical attention
Do not attempt to remove the object.
Cut near the eye
Loosely bandage both eyes and seek medical attention
Do not rub, press, or wash the cut because it could cause further damage.
Bump or bruise near the eye
Apply a cold compress for 15 minutes to reduce swell and seek medical attention.
Welding arc burn
Keep eyes closed and seek medical attention. The victim may or may not feel pain immediately but eye may be sensitive to light, red, or swollen for up 12 hours after the incident.
Resources:
For more information, click on a related personal protective topic below:
Photos provided by the Central States Center for Agricultural Safety and Health (CS-CASH)
Chainsaws are valuable labor-saving devices used by many farm, ranch, and home owners. However, in the hands of an untrained operator, a chainsaw is extremely dangerous. A chainsaw at full speed runs more than 30 ft. of chain past a single point on the bar in the split-second it takes for a user to react.
Safety Precautions to Reduce Risk of Injury or Death
Take the following steps to reduce the risk of injury or death when using a chainsaw:
Read the device’s instruction manual and safety manual, and then follow all recommended guidelines for the use of the chainsaw.
Store the device’s manuals in a place where you can easily find them, and contact the company should you need to replace them. (Most chainsaw manuals are available online.)
If you have never used a chainsaw, seek the guidance of a qualified mentor before using the chainsaw.
Wear all personal protective equipment (PPE) recommended for chainsaw use while operating the chainsaw.
Know the chainsaw’s limitations, know your own limitations, and take your time and rest often so that you remain alert for potential hazards.
Personal Protective Equipment (PPE)
Apply the following recommendations and information regarding PPE whenever you operate a chainsaw:
Clothing: Clothes should fit well and should not dangle or have ragged edges that can get caught on limbs, bark, or the saw.
PPE: All PPE required for operating a chainsaw must fit the operator properly and be in good condition.
Leg chaps: Protective leg chaps made from ballistic nylon or Kevlar protect the legs from the running chain saw.
Hard hat: Wear a properly fitted hard hat that is comfortable and provides protection from small falling limbs or debris.
Face protection: Wear either a full-face shield or safety goggles or safety glasses with side shields to protect your face from flying wood chips, twigs, and sawdust.
Hearing protection: Wear earplugs and/or earmuffs to protect your hearing from the noise levels associated with running a chainsaw, which can exceed 90 decibels (dB). Use hearing protection with a minimum noise reduction rating (NRR) of 25 to reduce your risk of noise-induced hearing loss.
Footwear: Wear steel-toed high-top boots with aggressive-treaded soles to protect you from slipping and to protect your feet from potential contact with the saw chain or with heavy falling or rolling objects.
Gloves: Wear leather gloves to protect your hands from cuts, abrasions, or splinters. You can wear specialized woodcutter’s gloves that have slip-resistant palms and are made of synthetic cut-resistant material similar to the material in leg chaps.
To learn more about PPE related to operating a chainsaw, view the following video by Progressive Farmer:
Chainsaw Selection
There are three size classes of chainsaws. It is important to identify the one that is the best match for the job(s) that you need to complete.
Small-sized chainsaws have 8-in. to 14-in. guide bars and are designed to do light work, such as cutting small branches and felling very small trees.
Medium-sized chainsaws have 16-in. to 22-in. guide bars and work well for felling, limbing, and bucking trees in the diameter range of 8 in. to 22 in.
Large-sized chainsaws are designed for professional users and usually have guide bar lengths greater than 18 in. These chainsaws are designed for heavy daily logging use.
After you have determined the appropriate size chainsaw for your needs, select a chainsaw that is quiet and balanced and equipped with the following safety features:
Front hand guard: The front hand guard is a paddle-like device, located ahead of the front (top) handle of the chainsaw such that it stops an operator’s left hand from coming in contact with the chain if this hand slips off the handle.
Chain brake: Chain brakes, a feature of gas chainsaws, reduce the risk of injury, if activated, by stopping the saw’s chain immediately if kickback occurs. Usually, the chain brake is activated by contact with the front hand guard, but it also may be activated by a sudden jerk of the chainsaw (inertia activated feature). It is strongly recommended to purchase chainsaws with both types of chain brake activation in the chain brake system.
Throttle trigger interlock: This feature prevents the accidental opening of the throttle.
Stop switch: The stop switch should be easy for an operator to activate with his or her right thumb while gripping the saw’s rear handle.
Antivibration system or vibration damping: An antivibration system can reduce operator fatigue and decrease the strain placed on the operator’s hands. Vibration damping (achieved through rubber bushings and/or metal springs on the chainsaw) reduces the operator’s exposure to vibration.
Rear hand guard: A rear hand guard on the lower part of the chainsaw by the rear handle protects the operator’s right hand from a broken or jumping chain.
Reduced kickback or antikickback chain: Most consumer chainsaws are equipped with low-kickback chains or chains that are designed to have reduced kickback energy.
Chain catcher: This feature is designed to catch a broken or jumping chain.
Continuous pressure throttle: This feature shuts off power to a chainsaw when pressure is reduced.
Muffler: The muffler limits the noise level of the saw and directs hot exhaust gases away from the operator.
Spark arrestor: A spark arrestor prevents sparks from being ejected by the exhaust.
Chainsaw Maintenance and Fueling
A chainsaw that is in proper working condition is safer and easier to operate than a poorly maintained machine. Before using your chain saw, take the following actions:
Make sure the chain is properly sharpened.
Make sure the chain is properly tensioned on the chainsaw bar.
Make sure the chain oiler reservoir is filled with proper bar and chain oil.
Maintaining proper chain tension during chainsaw operation is important because a loose chain could come off and a tight chain could bind and overheat. When you are sharpening the cutters on the chainsaw chain, wear gloves and cover the chain with a heavy rag. Make sure your chain oiling system is working properly. To learn how to sharpen your chainsaw, watch the following video from Progressive Farmer:
Allow the chainsaw to cool 5 minutes before refueling, and use a funnel or flexible nozzle to avoid spills. Make sure the chainsaw is at least 20 ft. away from any sources of ignition prior to fueling. If any fuel is spilled, wipe the saw dry before starting it. Move the chainsaw at least 10 ft. from the fueling area before attempting to start it.
Chainsaw Operation
Always engage the chain brake before attempting to start the chainsaw. There should always be two points of contact with the chainsaw (other than the hand on the starter rope) when starting the chainsaw. Study and practice the two approved starting methods for the gas-powered chainsaws described in your chainsaw operator’s and/or safety manual. Never hold the starter rope and use the weight of the saw to “drop start” the saw—you risk serious injury from recoil of the chainsaw bar. For information about starting a chainsaw, watch the following video from Stihl titled “How to Start a Stihl Chainsaw”:
Maintain secure footing and balance during operation of the chainsaw. Always hold the chainsaw firmly with the right hand on the rear handle and the left hand on the front handle. Use an encircling grip (fingers over/thumb under on each handle). Remember to turn off the chainsaw, engage the chain brake, and carry the saw with the bar facing rearward and the muffler away from you when walking more than 50 ft. or across hazardous terrain. Engage the chain brake when moving short distances (less than 50 ft.) with the chainsaw running.
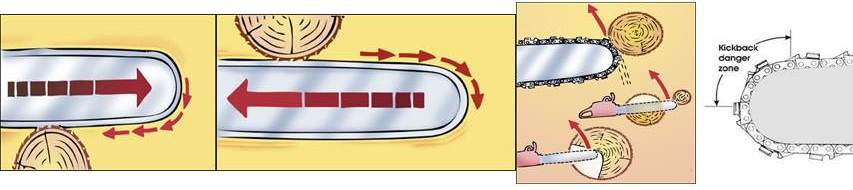
Addressing Pull-in, Pushback, and Kickback Reaction Forces
(Source: University of Missouri with permission granted from Stihl Chainsaw, Inc.)
Violent reaction forces occur when the teeth of a chainsaw catch on something or when wood closes in and pinches the saw chain, causing the saw chain to stop instantly. The resulting reaction forces cause the chainsaw to be pulled away from the operator (pull-in force—frame 1 of image above), cause the chainsaw to be pushed back toward the operator (pushback force—frame 2 of image above), and/or cause kickback toward the operator (kickback force—frame 3 of image above). The pull-in force occurs when the chain on the top of the bar is being used to cut an object. The pushback force occurs when the chain on the bottom of the bar is being used to cut an object. The kickback force occurs when the chain on the upper quadrant of the nose of the bar (frame 4 of image above) comes in contact with another object.
All of these forces happen quicker than the operator can react. Proper PPE; stance (body, foot, and arm position); grip on the chainsaw; and cutting techniques may significantly reduce the occurrence of and risk associated with these reaction forces. Poor control of these reaction forces by the untrained operator, careless operator, or inattentive operator may result in serious or fatal injury.
The kickback force generally is regarded as the most dangerous of the reaction forces because the blade of the chainsaw usually is thrown into the head, neck, or shoulder area of the operator, resulting in serious or fatal injury. The end result of an uncontrolled pull-in or pushback reaction force may be a kickback reaction. If the tip of the chainsaw blade is pulled into another object in the case of a pull-in reaction or strikes solid material as the tip exits the cut at the end of the pushback reaction, a kickback force results.
Take the following precautions to prevent kickback:
Hold the saw firmly with both hands using an encircling grip.
Do not cut limbs or brush with the nose of the guide bar.
Begin and continue cutting at full throttle.
Cut only one log at a time.
Use caution when reinserting the chainsaw blade into a previous cut or withdrawing it from the current cut.
Be aware of the location of your guide bar nose at all times when starting or operating the chainsaw and do not let it come into contact with an object.
Do not attempt a chainsaw cutting technique called bore cutting (plunge cutting) without hands-on training and supervised practice to teach you to properly do this cutting technique while helping you become proficient with this technique.
Felling a Tree
Proper felling of a tree with a chainsaw is a planned operational process that results in causing a tree to fall from a standing position to a predetermined location lying on the ground while minimizing risks to the saw operator, coworkers, the residual forest stand, and any other important objects in the immediate area. This complicated process involves hazard analysis, site assessment, and a careful evaluation of the tree’s properties (health, weight distribution, leans, and entanglements with other trees or vines). The results of this analysis are used by the faller (the saw operator) to plan the felling job. The faller sets up escape routes, chooses which specific felling techniques are needed, plans the sequence of events, and selects the tools he or she will need to complete the felling job safely and effectively. The faller communicates the plan to all coworkers and is responsible for the safety of all coworkers and others in the immediate area.
The process of felling a tree with a chainsaw should never be attempted by the untrained chainsaw operator. A faller needs to have had hands-on training in this activity by a skilled professional and supervised practice under the guidance of this skilled professional because of the complicated and inherently dangerous nature of the activity of felling trees.
The following important training and skills-development activities are needed to safely and effectively fell trees:
Hazard assessment, mitigation, and avoidance techniques
Tree evaluation (tree size-up) procedures
Planning the felling job based on tree, site, and hazard information
Safety zone and escape route planning
Chainsaw cutting techniques specific to felling trees
Chainsaw operator skills necessary to execute felling cutting techniques
Knowing how, when, and why you use special felling tools (wedges and felling levers)
Controlling the entire felling process
Knowing your skill level and your limitations
Knowing what hazards make the job too dangerous to attempt
For more information about felling a tree, view the following video titled “Cut Down a Tree Safely—7-Step Method,” presented by Tim Ard of Forest Application Training, Inc., and produced by Progressive Farm Magazine:
Limbing
Limbing is the process of removing the branches and limbs from a fallen tree. Limbing with a chainsaw is perhaps the most dangerous activity the chainsaw operator does in the course of daily chainsaw operation. This is because of the following circumstances:
Felling the tree may have caused serious overhead hazards (widow makers) that may pose a direct threat to the chainsaw operator when limbing.
Felling the tree onto the ground created complex forces in limbs, branches, and tree stems which are released when these objects are cut with the chainsaw.
The fallen tree poses a complex collection of hazards that change as the chainsaw operator removes the limbs.
The chainsaw operator is forced to stand and work close to the hazards related to the fallen tree.
The chainsaw operator must constantly recognize, evaluate, mitigate, and/or avoid the hazards related to the fallen tree.
The chainsaw operator must cut in close proximity to his or her feet and legs.
The end of the chainsaw bar is used to make limbing cuts, and the kickback zone must be avoided.
An escape route must be maintained behind the chainsaw operator at all times.
Removing limbs from the tree may destabilize it, causing it to roll, drop, swing, or rise suddenly.
The chainsaw operator must stay aware of the slope of the terrain and stay on the uphill side of the fallen tree.
The process of limbing a fallen tree should never be attempted by an untrained chainsaw operator. A chainsaw operator attempting to limb a tree needs to have had hands-on training in this activity by a skilled professional and supervised practice under the guidance of this skilled professional because of the complicated and inherently dangerous nature of the activity of limbing fallen trees.
(Video Source: Husqvarna.com.)
Bucking
Bucking is the process of using a chainsaw to cut a tree into lengths of wood usable as pulpwood, saw logs, or firewood. The bucking process usually follows the limbing process but may be combined with the limbing process to help reduce forces on the remaining limbs by removing weight (log length portions) from the previously limbed areas of the tree stem. The hazards associated with this operation are mostly related to sudden movement of the bucked section, the remaining tree stem, or both following or during the bucking cut with the chainsaw. There is a strong possibility that serious or fatal crush injuries may result if an untrained chainsaw operator attempts to buck tree stems.Hands-on training in this activity by a skilled professional and supervised practice under the guidance of this skilled professional will help to minimize the risk of these injuries. The following important training and skills-development activities are needed to buck trees safely and effectively:
Assessing the presence of binds (forces in the tree stem due to its position on the existing terrain) at the point where the bucking cut is to be made (see the images below)
Recognizing, mitigating, or avoiding the hazards to the chainsaw operator caused by binds
Chainsaw cutting techniques specific to bucking safely and effectively
Chainsaw operator skills necessary to execute bucking cut techniques
Recognizing terrain features which may lead to sudden log or stem movement (cut from the uphill side)
Providing adequate escape routes
Use of wedges to control bucking cuts (avoid unwanted stem movement or chainsaw contact with the ground)
(Source: University of Georgia.)
One of the most common problems during bucking is running the chainsaw into the ground. A sawbuck can make this task easier by holding the log still at the appropriate working height so that you can safely cut the tree into the appropriate lengths. Another useful device is a log jack (adapted peavey), which can lift one end of a log off the ground for bucking. Log jacks are commercially available or can be built in a farm shop.
(Video Source: Progressive Farmer Magazine.)
Additional Safety Recommendations
Never operate a chainsaw alone. Always work with a competent adult partner.
Because operating a chainsaw can place strain on the back, stretch and strengthen your back muscles to decrease the strain.
Stay low to the ground, and do not operate your chainsaw at a level higher than your waist.
Do not permit a child to operate a chainsaw. Do not use a chainsaw in close proximity to children or pets.
Tell other people where you are going to be working and when you expect to return.
Always know the location of other people in your group, especially when felling a tree.
Maintain at least 2½ tree lengths between you and other persons operating chainsaws when felling.
Make sure your chainsaw is sitting upright during transport to avoid spillage of gasoline.
Never transport a chainsaw in the passenger area of a vehicle because the chainsaw could become a dangerous projectile or a source of highly flammable liquid in the event of an accident.
When working with a chainsaw, make sure you have a complete first-aid kit with you and the current training to use this kit to control or treat severe bleeding, second-degree burns, broken bones, and shock.
To check the temperature of large hay bales, insert a thermometer into the hay to take a temperature reading. Monitoring the temperature of large hay bales can be dangerous, so it is important to take appropriate safety precautions when performing this task:
Always work with a partner when monitoring the temperature of hay bales.
Before checking the temperature of stacked bales, place wooden planks or plywood across tops of the bales. The person checking the bales’ temperature should stand on these planks to help distribute his or her body weight and reduce the risk of falling into a burned-out cavity.
The person testing the hay should wear a harness and lifeline attached to a secure object. If an emergency occurs, the observing partner can pull the other person out of the hay.
Due to the potential dangers of this task, never assign youth workers to monitor the temperature of hay bales.
There are commercial thermometers available to test the temperature of stored hay. If your commercial thermometer is not long enough to insert into a bale, you can fabricate a probe from a 10 ft. length of 3/4 in. diameter iron pipe. Drill eight 3/16 in. diameter holes about 3 in. from one end of the pipe. Hammer that end of the pipe into a sharp edge to create a probe. After inserting the probe into a hay bale, use a piece of thin wire to lower a thermometer down to the end of the pipe. Keep the thermometer in this position for approximately 10 to 15 minutes to obtain a temperature reading. (The steps you should take next depend on the temperature of the hay.)
If you do not have a commercial thermometer, you can use a 3/8 in. pipe that is 8 to 10 ft. long to check the temperature of baled hay. The person testing the hay should drive the pipe into a bale and leave the pipe in place for 20 minutes. When it is withdrawn from the hay, if the pipe is too hot to touch with a bare hand, the hot hay should be removed.
Click here to view the article “Preventing Fires in Baled Hay and Straw” to learn more about monitoring hay temperature and preventing fires in round bales.
The size and weight of equipment determine the number of tie-downs needed to properly secure a load. An additional tie-down is required for any attachments, such as a loader bucket. For example, a midsize skid steer weighing 6,200 lb. would require two tie-downs for its weight, plus an additional tie-down for every 10 ft. of length over 5 ft. In total, four tie-downs would be required to properly secure the load.
Ensure that the tie-downs are rated appropriately for the load to be secured by checking the tensile-strength rating of the straps or chains. Check the tie-downs for frayed or torn sections and remove from service any damaged tie-downs. Consider chains and chain binders as a means of securing the load as well. Meet the requirements for numbers of tie-downs by using sound tie-down devices.
For more information, click here to be directed to the U.S. Department of Transportation, Federal Motor Carrier Safety Association.
A crush point exists at the point where two objects meet. The objects can be moving toward each other, or one object can be moving toward a stationary object. Crush points are hazardous because the objects coming together can easily crush body parts. The most common example of a crush-point hazard is the attachment to the drawbar of a tractor. Other examples of crush point hazards include three-point hitches and components moved by hydraulic cylinders.
Click here to view the article “Mechanical Hazards: Crush Points” for detailed information about crush point hazards.
Wearing multiple layers of clothing in cold weather allows you to adjust insulation according to a changing environment. For example, wearing multiple layers allows you to remove a layer when working in a heated area, and then to put the layer on again before moving outside. In addition, the performance of manual work can lead to overheating, so wearing multiple layers allows you to adjust clothing appropriately for a task. Multiple layers can keep moisture from accumulating, either on the inside from sweat or on the outside from rain or snow.
Recommendations
Before you go out into the cold, let’s consider the layers you should wear.
Inner Layer
The main purpose of the inner lay is to wick away moisture from the skin, and the best material for the job is polyester. Polyester is highly effective at wicking moisture, which is why it is used to make long underwear. Avoid cotton as an inner layer because it is ineffective at keeping moisture away from your skin.
Middle Layer
The middle layer is the insulation layer, and it should actually be made up of multiple layers rather than one thick layer. Just like the inner layer, the middle layer should allow moisture to move away from the body. The garments’ ability to insulate comes from their thickness and ability to trap air. Wearing multiple middle layers can also help you respond to various levels of activity.
Outer Layer
The outer layer is the first line of defense against the elements, so it must also allow moisture to move away from the body. When choosing the appropriate outerwear, consider the fabric and construction of the garment, the level of comfort you desire, the type of physical work you’ll be doing while wearing the garment, and environmental conditions. Look at the hood, collar, sleeves, pockets, zippers, and the length of the garment, and remember that some of these elements may have been designed more for fashionability than practicality. For example, consider whether the zipper is large enough for you to operate while wearing gloves. Make sure that your outer garment is not restrictive; a garment that is too small could hinder blood flow that increases conductive cooling.
Click here for more information about cold-related conditions and agriculture.
Some farm machines, such as combines and feed rollers, have rotating parts. Where these parts are close together, they form pull-in points, or points that can catch and quickly draw fabric, body parts, or other items into contact with machinery. Pull-in point hazards are commonly associated with crops being fed into machinery. A pull-in point incident can be very serious because a person can sustain injuries such as amputation, crushed tissue, and broken bones—these incidents can even be fatal.
Avoid a pull-in point incident by always shutting off the tractor or other power source before clearing any plug or jam from equipment or completing any repairs.
To learn more about pull-in points, click here to link to the article “Mechanical Hazards: Pull-in Points.”
Manage Cookie Consent
To provide the best experiences, we use technologies like cookies to store and/or access device information. Consenting to these technologies will allow us to process data such as browsing behavior or unique IDs on this site. Not consenting or withdrawing consent, may adversely affect certain features and functions.
Functional
Always active
The technical storage or access is strictly necessary for the legitimate purpose of enabling the use of a specific service explicitly requested by the subscriber or user, or for the sole purpose of carrying out the transmission of a communication over an electronic communications network.
Preferences
The technical storage or access is necessary for the legitimate purpose of storing preferences that are not requested by the subscriber or user.
Statistics
The technical storage or access that is used exclusively for statistical purposes.The technical storage or access that is used exclusively for anonymous statistical purposes. Without a subpoena, voluntary compliance on the part of your Internet Service Provider, or additional records from a third party, information stored or retrieved for this purpose alone cannot usually be used to identify you.
Marketing
The technical storage or access is required to create user profiles to send advertising, or to track the user on a website or across several websites for similar marketing purposes.