The majority of serious farm incidents involve machinery and equipment, but many hazards can be found in all areas of farm operations. Many of these incidents can be prevented through an inspection and correction of the hazard. The challenge is that most agricultural producers do not know how to properly assess and correct hazards on their farm operation.
The Farm/Agriculture/Rural/Management-Hazard Analysis Tool (FARM-HAT) was developed by the Pennsylvania State University and is the most comprehensive on-line tool for assessing and identifying ways to correct hazards in 11 major categories including, but not limited to, farm operations, dwellings, agritourism, and tractors. FARM-HAT can be used by farmers, extension educators, insurance agents and others that are interested in improving the safety of a farm operation, equipment or rural enterprise.
Take the inspection of your farm operation very seriously and also recruit other farm family members to participate in the process. Inspections can be done at various times of the year. Consider inspecting yours tractors and machinery over the winter so that you have time to complete repairs before the spring when you are preparing for the planting season.
In addition to FARM-HAT, other resources are available for specialized inspections including barns, machinery and tractors. Listed below are links to checklists for farm operations.
Resource Links – Pick a Site and Start Your Farm Inspection:
Every job has its hazards, but agricultural work consistently ranks as one of the most dangerous occupations. One of the most effective ways to improve workplace safety is to conduct a review of workplace hazards and the potential injuries that could result from the hazards. A job safety analysis (JSA), sometimes referred to as job hazard analysis (JHA), is a written protocol that identifies existing or potential hazards associated with each step or task within a particular job and integrates safety and health solutions to reduce exposure to those risks.
An effective JSA:
identifies hazards,
involves workers in the identification of potential risks related to their jobs,
provides a basis for training workers in safe operating procedures,
increases awareness of safety practices in the workplace,
decreases the number of injury-related absences, and
lowers costs for workers’ compensation claims.
After a JSA is completed, it can be used as a training resource in two ways:
as a tool with new employees to review their jobs and provide information about mandatory safety practices
as a refresher on hazards and recommended safety considerations when completing infrequent or unfamiliar tasks
Ultimately, the final result of a JSA should be a safe, productive, and efficient work environment on the farm or ranch. A current, complete JSA will foster communication as well as improve worker safety and health.
Steps Involved in Developing a JSA
There are four basic steps in the JSA process:
Selecting the job
Breaking down the job into steps
Identifying potential hazards
Developing solutions and recommended actions
Step One: Selecting the Job
Develop a JSA for all jobs, but give priority to those jobs in which workers have been injured or have a greater risk of injury.
When a new job is introduced at your farm or ranch, complete a JSA and use the JSA document to train your workers on safe operating procedures for the job.
Step Two: Break Down the Job into Steps
Break the job into discrete steps or tasks.
At this point, you are identifying what is done, not how it is done.
Include only four to nine steps in a job description, and make sure they are neither too detailed nor too general. If more than 10 steps are necessary to define a job, consider dividing the job into two segments, each with its own JSA.
Identify the steps in a job in several ways:
Observe an experienced workercompleting the job during a regularly scheduled time and at the usual location.
Ask workers to write the steps they take when completing the job. Make sure workers understand while developing a JSA that this process is not about their job performance but about determining the actions involved in completing a job. Consider workers’ suggestions for improving steps.
Consult multiple people familiar with a job to ensure that all steps are accounted for and listed in the correct sequence.
Begin the definition of each step with an action word and list steps in successive order.
Additionally, take note of the following:
unsafe shortcuts
necessary equipment maintenance
the physical space where the job is completed
Step Three: Identify Potential Hazards
Identify hazards and any actions or conditions in each step of the job that could lead to an injury. It may be useful to use a hazard-inspection form as a tool to identify the potential hazards.
Evaluate and discuss each potential hazard, identifying the types of injuries that might occur. Be sure to include those hazards that have a low occurrence rate or are unlikely to happen. The following questions can help you identify potential hazards or problems associated with a job or steps in a job:
Is the worker at risk for a slip, trip, or fall?
Is the worker exposed to fumes or dust?
Does the equipment or machinery used pose any hazards? Are there missing shields or guards, exposed pinch points, possible crush points, or potential entanglement areas?
Do any of the hand or power tools pose any hazards? Does a tool have missing shields or guards, a frayed power cord, or cracked handles? Does the tool lack a ground fault interrupt?
Could a worker sustain an injury from lifting, pushing, or pulling?
Is the worker exposed to excessive noise or vibration?
Are there environmental issues, such as weather, that could affect the safeness of the job?
Are workers wearing the appropriate personal protective equipment (PPE) for the job?
Is there adequate lighting in the work space?
Step Four: Develop Solutions and Recommended Actions
Determine ways to eliminate, control, or minimize the identified hazards. Ideally, you should attempt to eliminate the hazard by modifying the process, changing the equipment, or improving the environmental conditions. If you cannot eliminate the hazard, look for solutions that control or minimize the workers’ exposure to the risk. These solutions may require the use of enclosures, guards, shields, or designated work areas.
Provide a recommended action for each step, and state specifically how the step should be completed. For example, you may phrase a step as follows: “When lifting a box from the floor to the counter, use your leg muscles to accomplish the lift.” Identify PPE, hand signals, and any additional safety recommendations, such as lockout procedures, for each step.
Evaluation and Follow-Up
Evaluate the effectiveness of the JSA after any injury or illness that occurs as a result of the execution of a job.
Review the causes of the injury or illness, and change the procedures or add safety measures as appropriate.
When you introduce new equipment, processes, or materials or make environmental changes, modify or update the JSA to reflect any changes.
Review all JSA changeswith workers to ensure that everyone understands new procedures or preventative measures.
Final Recommendations
As you complete your JSA, pay close attention to the following details:
Be specific and carefully choose your words to describe each step thoroughly. Avoid using vague phrases, such as “be careful” or “use caution,” without specific guidance.
Investigate each job carefully to identify all potential hazards, especially those that you may consider less severe or that seem to have a low likelihood of occurring.
Fully describe the types and severity of hazards.
Align job steps and safety procedures so that each hazard or potential injury identified has a corresponding solution or mitigation strategy.
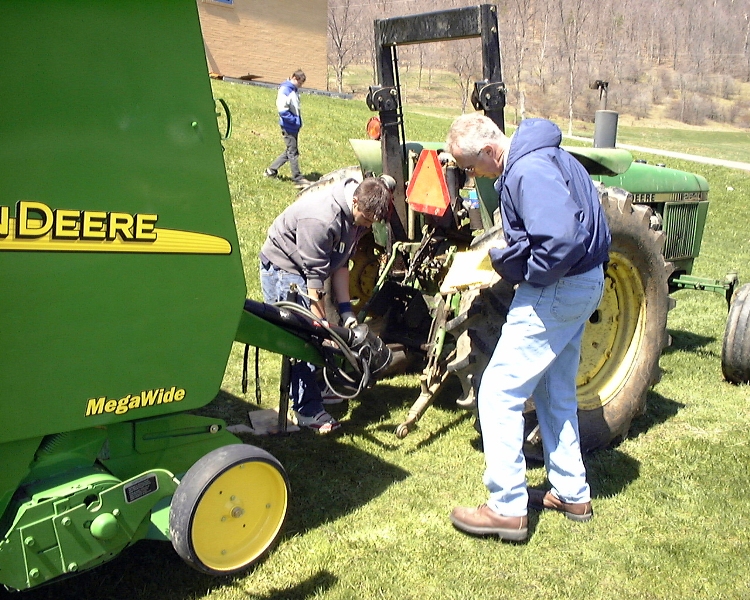
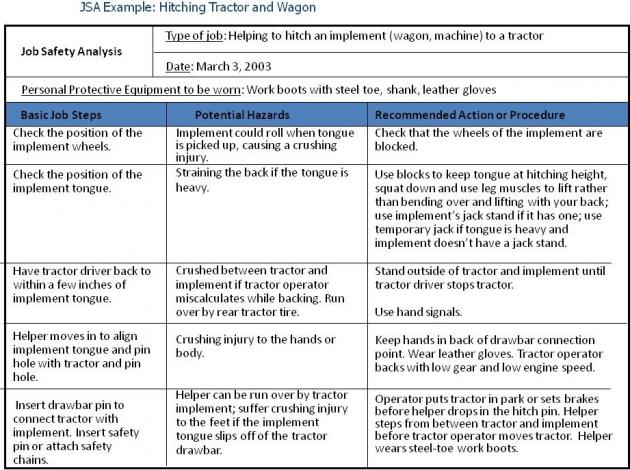
Sample JSA
You may find it helpful to review the completed JSA below—about hitching a tractor and a wagon—to better understand the JSA process.
The following templates provide a starting point for developing a JSA:
Personal protective equipment (PPE) is important for agricultural producers to reduce their risk of injury or death. Most injuries to the head can be prevented by wearing the appropriate PPE. Proper head protection can mean the difference between a traumatic brain injury and a mild concussion. The two basic types of head protection are hard hats and bump caps. Each is designed for specific tasks because of their level of protection in the event of the following types of incidents:
Potential for objects to fall from above and strike a worker on the head,
Workers can bump their head against an object, or
Potential for head contact with an electrical hazard.
Hard Hats
(Photo Source: NIOSH, Division of Safety Research)
The purpose of a hard hat is to reduce the force of impact from falling objects (e.g., tools, wood, limbs, etc.). A hard outer shell is made of aluminum, fiberglass, or plastic. Newer hard hat shells are made of lightweight thermoplastic resin, which is highly impact resistant and has good dielectric (nonconductor of electric current) properties. The suspension system is made of plastic, nylon, or combination and is the energy-absorbing mechanism. It has crown straps that fit over the person’s head with an adjustable headband and protective padding to provide a barrier between the hat and the head. Protective headgear must fit appropriately on the body and head size of each individual.
Hard hats should be worn when completing activities such as building, demolishing or repairing structures, around or under conveyor belts, operating or repairing equipment, felling or trimming trees, etc. If your farm or ranch is subject to Occupational Safety and Health Administration (OSHA) regulations because you employ more than 10 people, the employer must have each employee wear a protective helmet when working in an area where there is a potential for a head injury.
Bump Caps
The purpose of a bump cap is to protect workers from common bumps and scrapes sustained when working in close quarters or under low ceilings. This type of head protection is lightweight with a thinner shell compared to a hard hat and has no suspension system. A bump cap only protects a person from bumps and minor head injuries. It provides absolutely no impact protection and should never be worn in areas with falling objects.
Head Protection Standards
Standards for hard hats are outlined by the International Safety Equipment Association (ISEA) and the American National Standard Institute (ANSI). Choose a hard hat that meets the recommended standards which should be labeled ANSI/ISEA Z89.1 – 2009 or ANSI/ISEA Z89.1 – 2014. In regards to hard hats, they are categorized into either Type I or Type II helmets. Type I helmets provide impact and penetration resistance for only the top of the hard hat. In addition to the protection of a Type I helmet, the Type II also provides some protection to the front, rear, and sides of the head. Additional hard hat classifications exist for the potential of electrical contact. These classifications include Class C (conductive), Class G (general), and Class E (electrical). No electric contact protection is provided by a Class C hard hat and the Class G is tested only at 2200 volts providing limited resistance to electricity. If there is any potential for electrical contact, choose a Class E hard hat because it is tested to withstand up to 20,000 volts of electricity. Standards are not applicable to bump caps.
The 2014 ANSI revision included changes in optional testing and marking features for head protection when used in high temperature environments.
Caring for Your Hard Hat
Just like a pre-operational check for equipment, it is also important to check your hard hat for any signs of damage (e.g., dents, cracks, etc.). If the hard hat is damaged, either replace the damaged parts or purchase a new one. Never attempt to fix a hard hat with adhesives because it could significantly weaken the impact quality or affect the dielectric protection. When checking your hard hat for damage, inspect the suspension part to ensure that the nylon is not broken and that the headband fits comfortably. Hard hats should be replaced at least every five years and the suspension should be replaced every 1 to 2 years.
When it comes to storing your hard hat, never store it where it is exposed to sunlight because the ultraviolet (UV) rays from the sun can damage and weaken the nonmetallic materials (e.g., plastic). UV damage can be seen on the shell by areas of dullness called chalking. These areas can begin to flake and degrade the surface. Replace your hard hat if chalking exists.
Symptom and Treatment for Head Injuries
The brain is a very fragile organ and floats inside the skull attached by a network of delicate fibers. An impact to the head can cause blood vessels to tear inside the brain resulting in swelling. If a person sustains a head injury that results in unconsciousness, they probably have a brain injury and emergency medical services should be contacted immediately. Never apply pressure to a bleeding head wound because the pressure may push bone fragments into the person’s brain.
If the person is unconscious for only a few minute, they may have a mild concussion but should return to normal function within about 45 minutes. However, evidence of a head injury may not appear for several hours. Therefore, it is important to monitor the victim for 48 hours and contact a physician if you observe any of the ten following signs:
Fluid or blooding coming from the nose or ears,
Bruising around the eyes or ears,
Persistent vomiting,
Large or unresponsive pupils,
Loss of coordination,
Difficulty speaking,
Severe and worsening headache,
Double vision,
Excessive drowsiness, and
Convulsions
Resources:
For more information, click on a related personal protective topic below:
American National Standard Institute and International Safety Equipment Association, 2014, ANSI/ISEA Z89.1-2014 – American National Standard for Industrial Head Protection, New York, NY. Retrieved from https://safetyequipment.org/standard/ansiisea-z89-1-2014/.
(Photo Source: National Children’s Center for Rural & Agricultural Health and Safety)
Farm and ranch operations continue to diversify by adding activities such as corn mazes, hay rides, and product sales (farm markets, pick your own, etc.). Although these new enterprises create additional revenue for the farm or ranch, these ventures also have their own set of potential safety hazards. The National Children’s Center for Rural and Agricultural Health and Safety developed a comprehensive website that will assist farmers and ranchers with usable information to minimize the risk of injury on their operations.
Click HERE to be directed to the “Integrating Safety into Agritourism” website, which provides an overview of agritourism safety and health. It gives you the option to select specific types of “walkthroughs” based on your operation. The Walkthrough tab on the home screen allows you to click on 11 different topics (animals, hand washing, machinery, etc.) that provide you with specific information about that topic. The walkthroughs use photos to contrast safety concerns and hazards with best practices and guidelines. Review questions and resource information accompany the photos.
Operating a business that involves working with the public can be challenging, and communication is highly essential when it comes to visitors to your farm or ranch. Many of these visitors will have little or no experience with agriculture, so it is important for you to minimize potential hazards and properly communicate information about hazards. Click HERE to be directed to a tutorial about communicating with your guests about hazards. The tutorial will assist you with the planning process and signage prior to and during your event.
The “Resource Section” of the website is a comprehensive list of resources divided into categories that will enable you to reduce the potential risk of injury through the use of proper planning, signage, policies, procedures, and health and safety guidelines. Click HERE to visit the resource page. It is divided into specific topic areas such as animal safety, corn maze safety, hayride safety, etc. Each topic area provides a checklist to use to “walk through” your operation and help you identify safety and health hazards. It also has resources you can use to address these hazards, including signage in both English and Spanish. All resources are free to download and use.
Reviewed and Summarized by:
Linda M. Fetzer, Pennsylvania State University – lmf8@psu.edu
Dennis J. Murphy, Pennsylvania State University – djm13@psu.edu
Personal protective equipment (PPE) is important for agricultural producers to reduce their risk of injury or death. Most eye injuries can be prevented by wearing the appropriate PPE.
Injuries to the eye can be expensive, painful, and may cause partial or total blindness. Proper eye protection is the best strategy in preventing eye injuries because most eye injuries are a result of flying particles. The eye has its own built-in protection from the surrounding bone structure, eyelashes, tearing, and blinking; but they are no match for particles entering the eye at a high rate of speed. Eye protection should be worn when completing the following types of jobs: feed grinding, handling chemicals, haying, welding, repairing equipment, and any task completed in a dusty environment.
Types of Eye Protection
There are 5 types of eye protection. Choose the type that best suits your vision and provides the best protection for the job that you are completing.
Basic Safety Glasses
(Source: Pennsylvania State University. Agricultural Safety and Health)
A pair of basic safety glasses provides protection when there is potential for particles to enter the eye from the front. Safety lenses in regular eyeglass frames are not considered suitable safety glasses. Most basic safety glasses do not provide side protection, but side protection is available on some safety glasses through either permanent or detachable side shields to protect the eye from above, below and on the sides. When choosing safety glasses with side protection, make sure that the sides do not interfere with your peripheral vision.
Prescription Safety Glasses
Prescription safety glasses are made of either plastic or metal and are available in both bifocals and tinted lenses. Use caution when choosing tinted lenses because these lenses take time for the tinting to disappear which can be hazardous when frequently going between inside and outside work areas. Choose tint lenses when activities may include bright flashes of light.
Goggles
Goggles provide inexpensive protection from all angles because they fit snugly around the eyes. This type of eye protection is especially good for jobs such as chainsaw operation, grinding, and riveting. Goggles are especially useful because they typically fit over most prescription eyeglasses and are usually ventilated with an anti-fog solution. Two of the most common models of goggles are eyecup or wire mesh. If working around chemicals, choose goggles with off-set ventilation ports.
Face Shields
Face shields are secondary protection and must be worn in conjunction with either glasses or goggles. This type of eye protection is especially designed to protect the user from heat, glare, and flying objects. Face shields can be attached to hard hats for those jobs that also require head protection.
Welding Helmets and Goggles
Welding Helmet. Photo source: Penn State University
A welding helmet is equipped with special filtering lenses that protect the eyes from the strong ultraviolet and infrared rays that can permanently damage eyes and cause blindness. Welding goggles have various filter lens shades to protect against sparks, rays, and flying particles. Talk with your local dealer to determine the filter lens shade that you need for the various types of welding. Stationary or lift-front lenses are available for both welding helmets and goggles.
Standards for Eye Protection
ANSI and ISEA standards for eye protection are determined based on the identified hazard in the workplace. Lenses that are ranked as basic are designated as Z87, but high impact lenses have a Z87+ designation.
Additional recommendations concerning eye protection include the following:
Do not share eye protection to reduce the risk of contracting a contagious eye disease from another worker.
Even though sunglasses are important for working outdoors, they are not considered to be eye protection.
Maintenance of Eye Protection
Regularly clean your protective eyewear in warm, soapy water because looking through dirty lenses can strain your eyes. Use a soft tissue or cloth to dry the lenses to reduce the risk of scratches because deep scratches or pitting may weaken the lenses. Goggles should fit snuggly over your eyes so replace elastic goggle headbands when they become stretched. Store your protective eyewear in a rigid case to reduce dust build-up and potential damage to delicate parts.
Maintain proper vision by having your eyes examined annually. Vision changes can occur that may require a prescription change or the need for prescription eye protection. If you wear contacts, always wear protective eyewear in work areas. The recommendation is to wear prescription eye protection instead of contacts especially in dusty environments because contact lenses may trap particles in the eye.
First Aid for Eye Injuries
The following chart outlines the first aid response to different eye injuries:
Type of Injury
Proper Treatment
Actions to Avoid
Foreign particle in the eye
Flush the eye with water until the object rinses out. If unable to flush the particle out, cover the eye and seek medical attention.
Do not rub your eye because your eye could be scratched or embed the object.
Object embedded in the eye
Bandage both eyes and seek medical attention
Do not attempt to remove the object.
Cut near the eye
Loosely bandage both eyes and seek medical attention
Do not rub, press, or wash the cut because it could cause further damage.
Bump or bruise near the eye
Apply a cold compress for 15 minutes to reduce swell and seek medical attention.
Welding arc burn
Keep eyes closed and seek medical attention. The victim may or may not feel pain immediately but eye may be sensitive to light, red, or swollen for up 12 hours after the incident.
Resources:
For more information, click on a related personal protective topic below:
Photos provided by the Central States Center for Agricultural Safety and Health (CS-CASH)
Chainsaws are valuable labor-saving devices used by many farm, ranch, and home owners. However, in the hands of an untrained operator, a chainsaw is extremely dangerous. A chainsaw at full speed runs more than 30 ft. of chain past a single point on the bar in the split-second it takes for a user to react.
Safety Precautions to Reduce Risk of Injury or Death
Take the following steps to reduce the risk of injury or death when using a chainsaw:
Read the device’s instruction manual and safety manual, and then follow all recommended guidelines for the use of the chainsaw.
Store the device’s manuals in a place where you can easily find them, and contact the company should you need to replace them. (Most chainsaw manuals are available online.)
If you have never used a chainsaw, seek the guidance of a qualified mentor before using the chainsaw.
Wear all personal protective equipment (PPE) recommended for chainsaw use while operating the chainsaw.
Know the chainsaw’s limitations, know your own limitations, and take your time and rest often so that you remain alert for potential hazards.
Personal Protective Equipment (PPE)
Apply the following recommendations and information regarding PPE whenever you operate a chainsaw:
Clothing: Clothes should fit well and should not dangle or have ragged edges that can get caught on limbs, bark, or the saw.
PPE: All PPE required for operating a chainsaw must fit the operator properly and be in good condition.
Leg chaps: Protective leg chaps made from ballistic nylon or Kevlar protect the legs from the running chain saw.
Hard hat: Wear a properly fitted hard hat that is comfortable and provides protection from small falling limbs or debris.
Face protection: Wear either a full-face shield or safety goggles or safety glasses with side shields to protect your face from flying wood chips, twigs, and sawdust.
Hearing protection: Wear earplugs and/or earmuffs to protect your hearing from the noise levels associated with running a chainsaw, which can exceed 90 decibels (dB). Use hearing protection with a minimum noise reduction rating (NRR) of 25 to reduce your risk of noise-induced hearing loss.
Footwear: Wear steel-toed high-top boots with aggressive-treaded soles to protect you from slipping and to protect your feet from potential contact with the saw chain or with heavy falling or rolling objects.
Gloves: Wear leather gloves to protect your hands from cuts, abrasions, or splinters. You can wear specialized woodcutter’s gloves that have slip-resistant palms and are made of synthetic cut-resistant material similar to the material in leg chaps.
To learn more about PPE related to operating a chainsaw, view the following video by Progressive Farmer:
Chainsaw Selection
There are three size classes of chainsaws. It is important to identify the one that is the best match for the job(s) that you need to complete.
Small-sized chainsaws have 8-in. to 14-in. guide bars and are designed to do light work, such as cutting small branches and felling very small trees.
Medium-sized chainsaws have 16-in. to 22-in. guide bars and work well for felling, limbing, and bucking trees in the diameter range of 8 in. to 22 in.
Large-sized chainsaws are designed for professional users and usually have guide bar lengths greater than 18 in. These chainsaws are designed for heavy daily logging use.
After you have determined the appropriate size chainsaw for your needs, select a chainsaw that is quiet and balanced and equipped with the following safety features:
Front hand guard: The front hand guard is a paddle-like device, located ahead of the front (top) handle of the chainsaw such that it stops an operator’s left hand from coming in contact with the chain if this hand slips off the handle.
Chain brake: Chain brakes, a feature of gas chainsaws, reduce the risk of injury, if activated, by stopping the saw’s chain immediately if kickback occurs. Usually, the chain brake is activated by contact with the front hand guard, but it also may be activated by a sudden jerk of the chainsaw (inertia activated feature). It is strongly recommended to purchase chainsaws with both types of chain brake activation in the chain brake system.
Throttle trigger interlock: This feature prevents the accidental opening of the throttle.
Stop switch: The stop switch should be easy for an operator to activate with his or her right thumb while gripping the saw’s rear handle.
Antivibration system or vibration damping: An antivibration system can reduce operator fatigue and decrease the strain placed on the operator’s hands. Vibration damping (achieved through rubber bushings and/or metal springs on the chainsaw) reduces the operator’s exposure to vibration.
Rear hand guard: A rear hand guard on the lower part of the chainsaw by the rear handle protects the operator’s right hand from a broken or jumping chain.
Reduced kickback or antikickback chain: Most consumer chainsaws are equipped with low-kickback chains or chains that are designed to have reduced kickback energy.
Chain catcher: This feature is designed to catch a broken or jumping chain.
Continuous pressure throttle: This feature shuts off power to a chainsaw when pressure is reduced.
Muffler: The muffler limits the noise level of the saw and directs hot exhaust gases away from the operator.
Spark arrestor: A spark arrestor prevents sparks from being ejected by the exhaust.
Chainsaw Maintenance and Fueling
A chainsaw that is in proper working condition is safer and easier to operate than a poorly maintained machine. Before using your chain saw, take the following actions:
Make sure the chain is properly sharpened.
Make sure the chain is properly tensioned on the chainsaw bar.
Make sure the chain oiler reservoir is filled with proper bar and chain oil.
Maintaining proper chain tension during chainsaw operation is important because a loose chain could come off and a tight chain could bind and overheat. When you are sharpening the cutters on the chainsaw chain, wear gloves and cover the chain with a heavy rag. Make sure your chain oiling system is working properly. To learn how to sharpen your chainsaw, watch the following video from Progressive Farmer:
Allow the chainsaw to cool 5 minutes before refueling, and use a funnel or flexible nozzle to avoid spills. Make sure the chainsaw is at least 20 ft. away from any sources of ignition prior to fueling. If any fuel is spilled, wipe the saw dry before starting it. Move the chainsaw at least 10 ft. from the fueling area before attempting to start it.
Chainsaw Operation
Always engage the chain brake before attempting to start the chainsaw. There should always be two points of contact with the chainsaw (other than the hand on the starter rope) when starting the chainsaw. Study and practice the two approved starting methods for the gas-powered chainsaws described in your chainsaw operator’s and/or safety manual. Never hold the starter rope and use the weight of the saw to “drop start” the saw—you risk serious injury from recoil of the chainsaw bar. For information about starting a chainsaw, watch the following video from Stihl titled “How to Start a Stihl Chainsaw”:
Maintain secure footing and balance during operation of the chainsaw. Always hold the chainsaw firmly with the right hand on the rear handle and the left hand on the front handle. Use an encircling grip (fingers over/thumb under on each handle). Remember to turn off the chainsaw, engage the chain brake, and carry the saw with the bar facing rearward and the muffler away from you when walking more than 50 ft. or across hazardous terrain. Engage the chain brake when moving short distances (less than 50 ft.) with the chainsaw running.
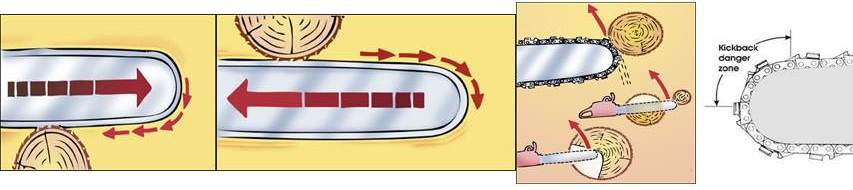
Addressing Pull-in, Pushback, and Kickback Reaction Forces
(Source: University of Missouri with permission granted from Stihl Chainsaw, Inc.)
Violent reaction forces occur when the teeth of a chainsaw catch on something or when wood closes in and pinches the saw chain, causing the saw chain to stop instantly. The resulting reaction forces cause the chainsaw to be pulled away from the operator (pull-in force—frame 1 of image above), cause the chainsaw to be pushed back toward the operator (pushback force—frame 2 of image above), and/or cause kickback toward the operator (kickback force—frame 3 of image above). The pull-in force occurs when the chain on the top of the bar is being used to cut an object. The pushback force occurs when the chain on the bottom of the bar is being used to cut an object. The kickback force occurs when the chain on the upper quadrant of the nose of the bar (frame 4 of image above) comes in contact with another object.
All of these forces happen quicker than the operator can react. Proper PPE; stance (body, foot, and arm position); grip on the chainsaw; and cutting techniques may significantly reduce the occurrence of and risk associated with these reaction forces. Poor control of these reaction forces by the untrained operator, careless operator, or inattentive operator may result in serious or fatal injury.
The kickback force generally is regarded as the most dangerous of the reaction forces because the blade of the chainsaw usually is thrown into the head, neck, or shoulder area of the operator, resulting in serious or fatal injury. The end result of an uncontrolled pull-in or pushback reaction force may be a kickback reaction. If the tip of the chainsaw blade is pulled into another object in the case of a pull-in reaction or strikes solid material as the tip exits the cut at the end of the pushback reaction, a kickback force results.
Take the following precautions to prevent kickback:
Hold the saw firmly with both hands using an encircling grip.
Do not cut limbs or brush with the nose of the guide bar.
Begin and continue cutting at full throttle.
Cut only one log at a time.
Use caution when reinserting the chainsaw blade into a previous cut or withdrawing it from the current cut.
Be aware of the location of your guide bar nose at all times when starting or operating the chainsaw and do not let it come into contact with an object.
Do not attempt a chainsaw cutting technique called bore cutting (plunge cutting) without hands-on training and supervised practice to teach you to properly do this cutting technique while helping you become proficient with this technique.
Felling a Tree
Proper felling of a tree with a chainsaw is a planned operational process that results in causing a tree to fall from a standing position to a predetermined location lying on the ground while minimizing risks to the saw operator, coworkers, the residual forest stand, and any other important objects in the immediate area. This complicated process involves hazard analysis, site assessment, and a careful evaluation of the tree’s properties (health, weight distribution, leans, and entanglements with other trees or vines). The results of this analysis are used by the faller (the saw operator) to plan the felling job. The faller sets up escape routes, chooses which specific felling techniques are needed, plans the sequence of events, and selects the tools he or she will need to complete the felling job safely and effectively. The faller communicates the plan to all coworkers and is responsible for the safety of all coworkers and others in the immediate area.
The process of felling a tree with a chainsaw should never be attempted by the untrained chainsaw operator. A faller needs to have had hands-on training in this activity by a skilled professional and supervised practice under the guidance of this skilled professional because of the complicated and inherently dangerous nature of the activity of felling trees.
The following important training and skills-development activities are needed to safely and effectively fell trees:
Hazard assessment, mitigation, and avoidance techniques
Tree evaluation (tree size-up) procedures
Planning the felling job based on tree, site, and hazard information
Safety zone and escape route planning
Chainsaw cutting techniques specific to felling trees
Chainsaw operator skills necessary to execute felling cutting techniques
Knowing how, when, and why you use special felling tools (wedges and felling levers)
Controlling the entire felling process
Knowing your skill level and your limitations
Knowing what hazards make the job too dangerous to attempt
For more information about felling a tree, view the following video titled “Cut Down a Tree Safely—7-Step Method,” presented by Tim Ard of Forest Application Training, Inc., and produced by Progressive Farm Magazine:
Limbing
Limbing is the process of removing the branches and limbs from a fallen tree. Limbing with a chainsaw is perhaps the most dangerous activity the chainsaw operator does in the course of daily chainsaw operation. This is because of the following circumstances:
Felling the tree may have caused serious overhead hazards (widow makers) that may pose a direct threat to the chainsaw operator when limbing.
Felling the tree onto the ground created complex forces in limbs, branches, and tree stems which are released when these objects are cut with the chainsaw.
The fallen tree poses a complex collection of hazards that change as the chainsaw operator removes the limbs.
The chainsaw operator is forced to stand and work close to the hazards related to the fallen tree.
The chainsaw operator must constantly recognize, evaluate, mitigate, and/or avoid the hazards related to the fallen tree.
The chainsaw operator must cut in close proximity to his or her feet and legs.
The end of the chainsaw bar is used to make limbing cuts, and the kickback zone must be avoided.
An escape route must be maintained behind the chainsaw operator at all times.
Removing limbs from the tree may destabilize it, causing it to roll, drop, swing, or rise suddenly.
The chainsaw operator must stay aware of the slope of the terrain and stay on the uphill side of the fallen tree.
The process of limbing a fallen tree should never be attempted by an untrained chainsaw operator. A chainsaw operator attempting to limb a tree needs to have had hands-on training in this activity by a skilled professional and supervised practice under the guidance of this skilled professional because of the complicated and inherently dangerous nature of the activity of limbing fallen trees.
(Video Source: Husqvarna.com.)
Bucking
Bucking is the process of using a chainsaw to cut a tree into lengths of wood usable as pulpwood, saw logs, or firewood. The bucking process usually follows the limbing process but may be combined with the limbing process to help reduce forces on the remaining limbs by removing weight (log length portions) from the previously limbed areas of the tree stem. The hazards associated with this operation are mostly related to sudden movement of the bucked section, the remaining tree stem, or both following or during the bucking cut with the chainsaw. There is a strong possibility that serious or fatal crush injuries may result if an untrained chainsaw operator attempts to buck tree stems.Hands-on training in this activity by a skilled professional and supervised practice under the guidance of this skilled professional will help to minimize the risk of these injuries. The following important training and skills-development activities are needed to buck trees safely and effectively:
Assessing the presence of binds (forces in the tree stem due to its position on the existing terrain) at the point where the bucking cut is to be made (see the images below)
Recognizing, mitigating, or avoiding the hazards to the chainsaw operator caused by binds
Chainsaw cutting techniques specific to bucking safely and effectively
Chainsaw operator skills necessary to execute bucking cut techniques
Recognizing terrain features which may lead to sudden log or stem movement (cut from the uphill side)
Providing adequate escape routes
Use of wedges to control bucking cuts (avoid unwanted stem movement or chainsaw contact with the ground)
(Source: University of Georgia.)
One of the most common problems during bucking is running the chainsaw into the ground. A sawbuck can make this task easier by holding the log still at the appropriate working height so that you can safely cut the tree into the appropriate lengths. Another useful device is a log jack (adapted peavey), which can lift one end of a log off the ground for bucking. Log jacks are commercially available or can be built in a farm shop.
(Video Source: Progressive Farmer Magazine.)
Additional Safety Recommendations
Never operate a chainsaw alone. Always work with a competent adult partner.
Because operating a chainsaw can place strain on the back, stretch and strengthen your back muscles to decrease the strain.
Stay low to the ground, and do not operate your chainsaw at a level higher than your waist.
Do not permit a child to operate a chainsaw. Do not use a chainsaw in close proximity to children or pets.
Tell other people where you are going to be working and when you expect to return.
Always know the location of other people in your group, especially when felling a tree.
Maintain at least 2½ tree lengths between you and other persons operating chainsaws when felling.
Make sure your chainsaw is sitting upright during transport to avoid spillage of gasoline.
Never transport a chainsaw in the passenger area of a vehicle because the chainsaw could become a dangerous projectile or a source of highly flammable liquid in the event of an accident.
When working with a chainsaw, make sure you have a complete first-aid kit with you and the current training to use this kit to control or treat severe bleeding, second-degree burns, broken bones, and shock.
To provide the best experiences, we use technologies like cookies to store and/or access device information. Consenting to these technologies will allow us to process data such as browsing behavior or unique IDs on this site. Not consenting or withdrawing consent, may adversely affect certain features and functions.
Functional
Always active
The technical storage or access is strictly necessary for the legitimate purpose of enabling the use of a specific service explicitly requested by the subscriber or user, or for the sole purpose of carrying out the transmission of a communication over an electronic communications network.
Preferences
The technical storage or access is necessary for the legitimate purpose of storing preferences that are not requested by the subscriber or user.
Statistics
The technical storage or access that is used exclusively for statistical purposes.The technical storage or access that is used exclusively for anonymous statistical purposes. Without a subpoena, voluntary compliance on the part of your Internet Service Provider, or additional records from a third party, information stored or retrieved for this purpose alone cannot usually be used to identify you.
Marketing
The technical storage or access is required to create user profiles to send advertising, or to track the user on a website or across several websites for similar marketing purposes.