Agricultural Vehicles in the Woods


Use the following format to cite this article:

Agricultural vehicles in the woods. (2014) Farm and Ranch eXtension in Safety and Health (FReSH) Community of Practice. Retrieved from http://articles.extension.org/pages/70337/agricultural-vehicles-in-the-w….


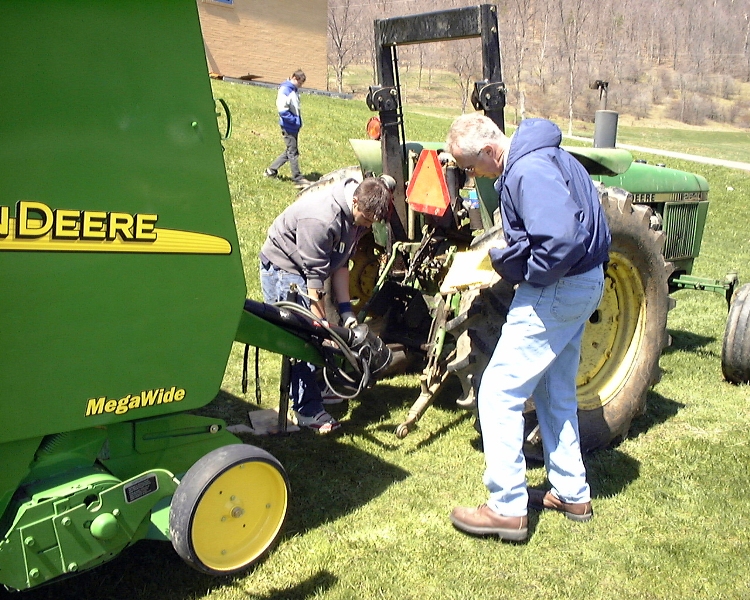
The risk of safety related incidents is high when a farmer or rancher uses a farm tractor to cut trees, clear fence rows, and gather firewood.  The typical farm tractor is simply not designed for use in woodlots. A farm tractor lacks the safety components of timber harvest tractors or skidders, which include the following:

  • A heavy steel skid plate to protect the underside of the machine
  • A protective radiator grill
  • Engine side guards
  • 10- to 12-ply flat sidewall tires
  • Tire chains
  • Front-end weights
  • 10-pound ABC fire extinguisher
  • A spark-arrester exhaust system
  • A category II falling object projective structure (FOPS) with a seat belt
  • A protective grill for the rear window and sides of the FOPS cab
  • High ground clearance
  • Lateral stability
  • Nearly equal front- and rear-axle weight distribution.

The photo below is an example of a tractor equipped with a Rollover Protective Structure (ROPS) and FOPS.

Tractor in the Woods

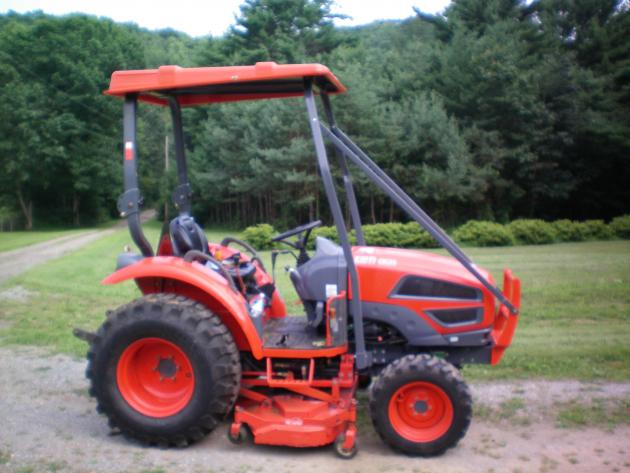
(Source: Lee Stover, L & E Stover Enterprises)

Dangerous Farm Tractor Usage

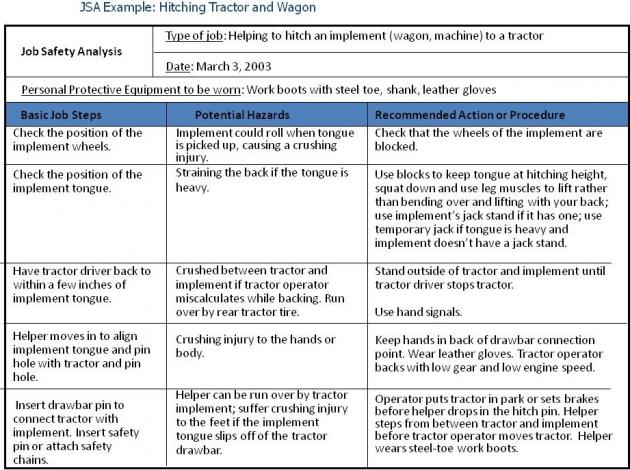
A rear overturn incident can occur with a farm tractor if a chain or cable is attached to a point higher on the tractor than the drawbar. Side overturn can occur when the farm tractor runs over a stump, rock, or tree trunk with a rear tire. Farm tractors equipped with a front-end loader should never be used to pull or push down limbs because the raised loader changes the center or gravity, placing the tractor at risk for a side overturn incident. Never use a farm tractor to complete forestry jobs such as pushing, dragging, or loading logs, without skid cones, log arches, three-point mounted grapples, or a skidding implement equipped with a three-point winch. These pieces of equipment reduce the risk of a log twisting or rolling out of the control while being dragged. Click here for more information on safe hitching.

All-Terrain Vehicles (ATVs) and Utility Vehicles (UTVs)

The potential for a tractor, ATV, or UTV overturn exists in woodlots because of uneven terrain and hidden obstacles such as rocks, roots, and stumps. Only specialized equipment such as timber harvest tractors and skidders should be used in woodlots. Felling of large trees for harvest should be completed by commercial operators with specialized equipment. Once a tree has been felled and located in a non-wooded area such as a fence row, the tree can be properly delimbed and sectioned for use on the farm or ranch. In order to remove the wood, you need to determine the best mode of transportation for the job and the environment.

ATVs towing wagons and UTVs with cargo beds or boxes continue to be popular choices, but it is important to understand their limitations. ATVs typically have lighter-duty suspension systems with less pulling and braking power, making them unsafe to complete most logging-type tasks. Some larger UTVs with a wider wheel base are equipped with a heavier frame and protective cage but still have limited capability in wooded areas.

When using a UTV or ATV to pull a trailer, the operator should be careful to observe the hauling capacity limits to reduce the risk of an incident. Check the manufacturer’s recommendation for any trailer that is being used to haul wood. Do not overload the trailer, and make sure that the wood is properly secured. The cargo box for each UTV has a recommended payload capacity that can vary between 500 and 1,400 pounds, depending on the make and model. It is extremely important to check the operator’s manual to determine the maximum payload capacity for your UTV. Keeping loads within the recommended payload capacity is essential to reducing the risk of an accident or potential damage to the UTV or ATV and trailer.

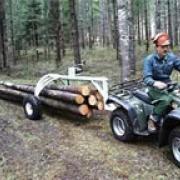
Extra precautions should be taken when using ATVs and UTVs in the woods for any activity. By hauling smaller amounts of wood slowly through a woodlot or along a trail that has been inspected for hidden obstacles, you can decrease the potential for an incident. Log arches can be used to stabilize smaller logs that need to be dragged from the woods, while reducing the possibility of the butt end of the log catching on a rock or stump or rolling sideways down uneven, sloping terrain. Consider winching logs that have fallen into precarious positions to a safer landing before using a light-duty ATV or UTV to pull them. The photo below shows an ATV using a log arch to safely transport logs on a path.

Log arch

Photo Source: Future Forestry Products, Inc. Log arch currently manufactured by Logrite of CT.


Additional Safety Recommendations:

  • If you are in the woods, inform other people of your location.
  • Always know the location of other people in your group, especially when felling a tree.
  • Make sure you have a complete first aid kit with you and have a basic understanding of first aid for severe bleeding, second-degree burns, and shock.

Resources

Click here to learn more about using your ATV on a farm or ranch.

Click here to learn more about chain saw safety.


Use the following format to cite this article:

Agricultural vehicles in the woods. (2014) Farm and Ranch eXtension in Safety and Health (FReSH) Community of Practice. Retrieved from http://articles.extension.org/pages/70337/agricultural-vehicles-in-the-w….


Sources

Murphy, D., Stover, L., & Harshman, W. (2011) Tractors in the woods. Penn State Extension. Retrieved from https://extension.psu.edu/tractors-in-the-woods.


Reviewers, Contributors, and Summarized by:
Willard Downs, University of Missouri – Willard@missouri.edu
Linda M. Fetzer, Pennsylvania State University – lmf8@psu.edu
Bobby Grisso, Jr., Virginia Tech – bgrisso@vt.edu
Bill Harshman, Pennsylvania State University (Has since retired)
Dennis J. Murphy, Pennsylvania State University (Has since retired)
Aaron M. Yoder, University of Nebraska Medical Center – aaron.yoder@unmc.edu 
 

Andrew S. Merryweather

Andrew Merryweather is an Assistant Professor in the Department of Mechanical Engineering at the University of Utah where he teaches and directs research in the areas of injury biomechanics, rehabilitation engineering, design, and 3D human motion analysis. Dr. Merryweather obtained his Ph.D. degree in Mechanical Engineering at the University of Utah in 2008. Over the past 10 years Dr. Merryweather has managed significant research projects investigating musculoskeletal injuries in the workplace, assistive technologies for persons with disabilities and many other projects involving computer modeling of human movement to understand and reduce injuries. 

Andrew holds adjunct research appointments in the Department of Physical Therapy and Family and Preventive Medicine. He is an active member of the Rocky Mountain Center for Occupational and Environmental Health and engages in research to prevent occupational injuries and rehabilitate injured workers.


Contact Information

Email: a.merryweather@utah.edu


Cultivate Safety

Cultivate Safety Logo

(Photo Source: National Children’s Center for Rural and Agricultural Health and Safety)

Family farms and farm workers from multiple generations are common in production agriculture. Involving children in work activities teaches them valuable skills and makes them feel included in the family business. However, work activities can also expose children to hazards and risks if they are completing tasks that are not appropriate for their age. In the United States, about 38 children are injured in farm-related incidents each day, and every three days a child dies as a result of a farm accident.

The National Children’s Center for Rural and Agricultural Health and Safety (NCCRAHS) developed a website to help parents remember that they are a “Parent First, Farmer Second.” The website provides user-friendly information about child development and age-appropriate work guidelines for farm tasks.

Click here to be directed to the Cultivate Safety website. In addition to information about child development and work guidelines, the website provides information on preventing injuries and real-life injury incidents. Interactive features provide users with opportunities to upload stories, videos, and photos about child injuries to encourage families to learn from one another.

 
Reviewed and Summarized by:
Linda M. Fetzer, Penn State University – lmf8@psu.edu
Dennis J. Murphy, Penn State University – djm13@psu.edu
Marsha A. Salzwedel, National Children’s Center for Rural and Agricultural Health and Safety – salzwedel.marsha@mcrf.mfldclin.edu
Aaron M. Yoder, University of Nebraska Medical Center – aaron.yoder@unmc.edu


Linda M. Fetzer

Linda Fetzer is the day-to-day manager of the Farm and Ranch eXtension in Safety and Health (FReSH) Community of Practice (CoP). She is also an Extension Associate in the Department of Agricultural and Biological Engineering at the Pennsylvania State University. As an Extension Associate at Penn State, Linda is a member of the Agricultural Safety and Health team and works with FReSH, Safety in Agriculture for Youth Project, AgrAbility for Pennsylvanians, Worker Protection Standard and statewide ag safety activities.


Contact Information

Email: lmf8@psu.edu

Twitter: @AgSafety4U

Lorann Stallones

Lorann Stallones is the Deputy Director of the High Plains Intermountain Center for Agricultural Safety and Health and is a Professor in the Department of Psychology at Colorado State University.  In addition, she is Director of the MPH program at CSU which is part of the inter-institutional Colorado School of Public Health. Her research has focused on the relationship between pesticide exposure, depression, and suicidal behaviors; acute traumatic injuries on farms; and farm worker related health and safety issues.

Contact Information

email: lorann@colostate.edu

Identifying and Correcting Hazards on Your Farm or Ranch

Tractor Safety Training

(Source: Penn State Ag Safety & Health)

Use the following format to cite this article:

Identifying and correcting hazards on your farm or ranch. (2013) Farm and Ranch eXtension in Safety and Health (FReSH) Community of Practice. Retrieved from http://articles.extension.org/pages/69135/identifying-and-correcting-haz….


The majority of serious farm incidents involve machinery and equipment, but many hazards can be found in all areas of farm operations. Many of these incidents can be prevented through an inspection and correction of the hazard. The challenge is that most agricultural producers do not know how to properly assess and correct hazards on their farm operation.  

The Farm/Agriculture/Rural/Management-Hazard Analysis Tool (FARM-HAT) was developed by the Pennsylvania State University and is the most comprehensive on-line tool for assessing and identifying ways to correct hazards in 11 major categories including, but not limited to, farm operations, dwellings, agritourism, and tractors. FARM-HAT can be used by farmers, extension educators, insurance agents and others that are interested in improving the safety of a farm operation, equipment or rural enterprise.  

Take the inspection of your farm operation very seriously and also recruit other farm family members to participate in the process. Inspections can be done at various times of the year. Consider inspecting yours tractors and machinery over the winter so that you have time to complete repairs before the spring when you are preparing for the planting season.

In addition to FARM-HAT, other resources are available for specialized inspections including barns, machinery and tractors. Listed below are links to checklists for farm operations.

Resource Links – Pick a Site and Start Your Farm Inspection:

  1. FARM-HAT (Penn State University)
  2. Evaluate Equipment for Dangers (Iowa State University)
  3. Your Personal Farm Safety Audit (Agricultural Safety and Health Network)


Use the following format to cite this article:

Identifying and correcting hazards on your farm or ranch. (2013) Farm and Ranch eXtension in Safety and Health (FReSH) Community of Practice. Retrieved from http://articles.extension.org/pages/69135/identifying-and-correcting-haz….


Citations:

Farm/Agricultural/Rural Management Hazard Analysis Tool. (2010) Penn State Agricultural Safety and Health. Retrieved from http://extension.psu.edu/business/ag-safety/farmhat.

Folsom, R. (2009) Barn and farm inspection checklist. Virginia Cooperative Extension. Retrieved from https://vtechworks.lib.vt.edu/bitstream/handle/10919/48862/VCE_Barn_Farm….

Hanna, M., Schwab, C., and Miller, L. (1998) Evaluate equipment for dangers. Iowa State University Extension and Outreach. Retrieved from http://nasdonline.org/2469/d002295/safe-farm-evaluate-equipment-for-dang….

Tractor Safety Checklist (n.d.). Canadian Agricultural Safety Association.  Retrieved from http://aghealth.usask.ca/resources/documents/TractorModulePDF.pdf.


Reviewed and Summarized by:
Linda M. Fetzer, Pennsylvania State University – lmf8@psu.edu
Dennis J. Murphy, Pennsylvania State University – djm13@psu.edu
Aaron M. Yoder, University of Nebraska Medical Center – aaron.yoder@unmc.edu

Job Safety Analysis

Ag Safety Instruction

Ag Safety Instruction

(Source: Penn State University Ag Safety & Health)

Use the following format to cite this article:

Job safety analysis. (2013) Farm and Ranch eXtension in Safety and Health (FReSH) Community of Practice. Retrieved from http://articles.extension.org/pages/69149/job-safety-analysis.


Every job has its hazards, but agricultural work consistently ranks as one of the most dangerous occupations. One of the most effective ways to improve workplace safety is to conduct a review of workplace hazards and the potential injuries that could result from the hazards. A job safety analysis (JSA), sometimes referred to as job hazard analysis (JHA), is a written protocol that identifies existing or potential hazards associated with each step or task within a particular job and integrates safety and health solutions to reduce exposure to those risks. 

An effective JSA:

  • identifies hazards, 
  • involves workers in the identification of potential risks related to their jobs, 
  • provides a basis for training workers in safe operating procedures, 
  • increases awareness of safety practices in the workplace, 
  • decreases the number of injury-related absences, and
  • lowers costs for workers’ compensation claims.

After a JSA is completed, it can be used as a training resource in two ways:

  • as a tool with new employees to review their jobs and provide information about mandatory safety practices
  • as a refresher on hazards and recommended safety considerations when completing infrequent or unfamiliar tasks

Ultimately, the final result of a JSA should be a safe, productive, and efficient work environment on the farm or ranch. A current, complete JSA will foster communication as well as improve worker safety and health.

Steps Involved in Developing a JSA

There are four basic steps in the JSA process:

  1. Selecting the job
  2. Breaking down the job into steps
  3. Identifying potential hazards
  4. Developing solutions and recommended actions

Step One: Selecting the Job

  • Develop a JSA for all jobs, but give priority to those jobs in which workers have been injured or have a greater risk of injury.
  • When a new job is introduced at your farm or ranch, complete a JSA and use the JSA document to train your workers on safe operating procedures for the job.

Step Two: Break Down the Job into Steps

  • Break the job into discrete steps or tasks.

    • At this point, you are identifying what is done, not how it is done.
    • Include only four to nine steps in a job description, and make sure they are neither too detailed nor too general. If more than 10 steps are necessary to define a job, consider dividing the job into two segments, each with its own JSA.    
  • Identify the steps in a job in several ways:

    • Observe an experienced worker completing the job during a regularly scheduled time and at the usual location.
    • Ask workers to write the steps they take when completing the job. Make sure workers understand while developing a JSA that this process is not about their job performance but about determining the actions involved in completing a job. Consider workers’ suggestions for improving steps.
    • Consult multiple people familiar with a job to ensure that all steps are accounted for and listed in the correct sequence.
  • Begin the definition of each step with an action word and list steps in successive order.

Additionally, take note of the following:

  • unsafe shortcuts 
  • necessary equipment maintenance
  • the physical space where the job is completed

Step Three: Identify Potential Hazards

  • Identify hazards and any actions or conditions in each step of the job that could lead to an injury. It may be useful to use a hazard-inspection form as a tool to identify the potential hazards.
  • Evaluate and discuss each potential hazard, identifying the types of injuries that might occur. Be sure to include those hazards that have a low occurrence rate or are unlikely to happen. The following questions can help you identify potential hazards or problems associated with a job or steps in a job:

    • Is the worker at risk for a slip, trip, or fall?
    • Is the worker exposed to fumes or dust?
    • Does the equipment or machinery used pose any hazards? Are there missing shields or guards, exposed pinch points, possible crush points, or potential entanglement areas?
    • Do any of the hand or power tools pose any hazards? Does a tool have missing shields or guards, a frayed power cord, or cracked handles? Does the tool lack a ground fault interrupt?
    • Could a worker sustain an injury from lifting, pushing, or pulling?
    • Is the worker exposed to excessive noise or vibration?
    • Are there environmental issues, such as weather, that could affect the safeness of the job?
    • Are workers wearing the appropriate personal protective equipment (PPE) for the job?
    • Is there adequate lighting in the work space?

Step Four: Develop Solutions and Recommended Actions

  • Determine ways to eliminate, control, or minimize the identified hazards. Ideally, you should attempt to eliminate the hazard by modifying the process, changing the equipment, or improving the environmental conditions. If you cannot eliminate the hazard, look for solutions that control or minimize the workers’ exposure to the risk. These solutions may require the use of enclosures, guards, shields, or designated work areas.
  • Provide a recommended action for each step, and state specifically how the step should be completed. For example, you may phrase a step as follows: “When lifting a box from the floor to the counter, use your leg muscles to accomplish the lift.” Identify PPE, hand signals, and any additional safety recommendations, such as lockout procedures, for each step.

Evaluation and Follow-Up

  • Evaluate the effectiveness of the JSA after any injury or illness that occurs as a result of the execution of a job.
  • Review the causes of the injury or illness, and change the procedures or add safety measures as appropriate.
  • When you introduce new equipment, processes, or materials or make environmental changes, modify or update the JSA to reflect any changes.
  • Review all JSA changes with workers to ensure that everyone understands new procedures or preventative measures.

Final Recommendations

As you complete your JSA, pay close attention to the following details:

  • Be specific and carefully choose your words to describe each step thoroughly. Avoid using vague phrases, such as “be careful” or “use caution,” without specific guidance.
  • Investigate each job carefully to identify all potential hazards, especially those that you may consider less severe or that seem to have a low likelihood of occurring.
  • Fully describe the types and severity of hazards.
  • Align job steps and safety procedures so that each hazard or potential injury identified has a corresponding solution or mitigation strategy.

Sample JSA

You may find it helpful to review the completed JSA below—about hitching a tractor and a wagon—to better understand the JSA process.  

JSA Hitching

The following templates provide a starting point for developing a JSA:

  • Click here for Template #1 from Safe Manitoba.
  • Click here for Temple #2 from Penn State University.

Resources:

Job Hazard Analysis JHA Infographic
(Source: BLR – Safety Summit)
 

Use the following format to cite this article:

Job safety analysis. (2013) Farm and Ranch eXtension in Safety and Health (FReSH) Community of Practice. Retrieved from http://articles.extension.org/pages/69149/job-safety-analysis.


Sources


Job hazard analysis sample form. (n.d.) SAFE Work Workplace Safety and Health Division and Workers Compensation Board of Manitoba. Retrieved from http://safemanitoba.com/job_hazard_analysis_sample_form.aspx.

Job safety analysis. (2008). Canadian Centre for Occupational Health and Safety. Retrieved from http://www.ccohs.ca/oshanswers/hsprograms/job-haz.html.

Murphy, D. (2008) Managing farm safety and health presentation at the Dairy Cattle Nutrition Workshop. Pennsylvania State University. Retrieved from http://www.das.psu.edu/research-extension/dairy/nutrition/pdf/murphy-managing-safety.pdf.

Sample written program for job safety analysis. (n.d.) Frankenmuth Insurance. Retrieved from http://www.fmins.com/pdf/safety_SERVICES/JobSafetyAnalysis.pdf.


Reviewers, Contributors, and Summarized by
Linda M. Fetzer, Pennsylvania State University – lmf8@psu.edu
Dennis J. Murphy, Pennsylvania State University – djm13@psu.edu
Cheryl Skjolaas, University of Wisconsin  skjolaas@wisc.edu
Chuck V. Schwab, Iowa State University  cvschwab@iastate.edu
Aaron M. Yoder, University of Nebraska Medical Center – aaron.yoder@unmc.edu


Karen Funkenbusch

Karen Funkenbusch Bio Photo

Karen Funkenbusch

Karen Funkenbusch is an instructor in the Division of Food Systems and Bioengineering Department of Agricultural Systems Management Program at the University of Missouri and an extension research associate, farm health and safety. She coordinates statewide leadership for farm health and safety, a University of Missouri Extension Outreach program serving the health and safety needs of agricultural workers. Karen is currently part of the leadership team for the Farm & Ranch eXtenision in Safety and Health (FReSH) Community of Practice (CoP).

Karen serves on several multi-state and national interdisciplinary teams, boards, councils, committees, and organizations that promote injury prevention and cultivate health strategies to safely improve lives, communities, and economies. She is active with the International Society of Agricultural Safety and Health (ISASH) board of directors, Missouri Arthritis Advisory Board (MAAB), NORA Agriculture, Forestry and Fishing Sector Council, National Center for Farmworker Health Advisory Committee, Regional Advisory Committee for the Great Plains Center for Agriculture Health, and Missouri Show Me Farm Safety Committee and is an active member of NCERA 197, ASABE, Epsilon Sigma Phi, UMEA, MAEP, NACAA, NARMH, and ARHP professional organizations.

Contact Information

Email: funkenbuschk@missouri.edu

Phone: 800-995-8503

Head Protection for Agricultural Workers


Use the following format to cite this article:

Head protection for agricultural workers. (2013) Farm and Ranch eXtension in Safety and Health (FReSH) Community of Practice. Retrieved from http://articles.extension.org/pages/69134/head-protection-for-agricultur….


Personal protective equipment (PPE) is important for agricultural producers to reduce their risk of injury or death. Most injuries to the head can be prevented by wearing the appropriate PPE. Proper head protection can mean the difference between a traumatic brain injury and a mild concussion. The two basic types of head protection are hard hats and bump caps. Each is designed for specific tasks because of their level of protection in the event of the following types of incidents:

  • Potential for objects to fall from above and strike a worker on the head,
  • Workers can bump their head against an object, or
  • Potential for head contact with an electrical hazard.

Hard Hats

Hard Hat

(Photo Source: NIOSH, Division of Safety Research)

The purpose of a hard hat is to reduce the force of impact from falling objects (e.g., tools, wood, limbs, etc.). A hard outer shell is made of aluminum, fiberglass, or plastic. Newer hard hat shells are made of lightweight thermoplastic resin, which is highly impact resistant and has good dielectric (nonconductor of electric current) properties. The suspension system is made of plastic, nylon, or combination and is the energy-absorbing mechanism. It has crown straps that fit over the person’s head with an adjustable headband and protective padding to provide a barrier between the hat and the head. Protective headgear must fit appropriately on the body and head size of each individual.

Hard hats should be worn when completing activities such as building, demolishing or repairing structures, around or under conveyor belts, operating or repairing equipment, felling or trimming trees, etc. If your farm or ranch is subject to Occupational Safety and Health Administration (OSHA) regulations because you employ more than 10 people, the employer must have each employee wear a protective helmet when working in an area where there is a potential for a head injury.

Bump Caps

The purpose of a bump cap is to protect workers from common bumps and scrapes sustained when working in close quarters or under low ceilings. This type of head protection is lightweight with a thinner shell compared to a hard hat and has no suspension system. A bump cap only protects a person from bumps and minor head injuries. It provides absolutely no impact protection and should never be worn in areas with falling objects.

Head Protection Standards

Standards for hard hats are outlined by the International Safety Equipment Association (ISEA) and the American National Standard Institute (ANSI). Choose a hard hat that meets the recommended standards which should be labeled ANSI/ISEA Z89.1 – 2009 or ANSI/ISEA Z89.1 – 2014. In regards to hard hats, they are categorized into either Type I or Type II helmets. Type I helmets provide impact and penetration resistance for only the top of the hard hat. In addition to the protection of a Type I helmet, the Type II also provides some protection to the front, rear, and sides of the head. Additional hard hat classifications exist for the potential of electrical contact. These classifications include Class C (conductive), Class G (general), and Class E (electrical). No electric contact protection is provided by a Class C hard hat and the Class G is tested only at 2200 volts providing limited resistance to electricity. If there is any potential for electrical contact, choose a Class E hard hat because it is tested to withstand up to 20,000 volts of electricity. Standards are not applicable to bump caps.

The 2014 ANSI revision included changes in optional testing and marking features for head protection when used in high temperature environments.

Caring for Your Hard Hat

Just like a pre-operational check for equipment, it is also important to check your hard hat for any signs of damage (e.g., dents, cracks, etc.). If the hard hat is damaged, either replace the damaged parts or purchase a new one. Never attempt to fix a hard hat with adhesives because it could significantly weaken the impact quality or affect the dielectric protection. When checking your hard hat for damage, inspect the suspension part to ensure that the nylon is not broken and that the headband fits comfortably. Hard hats should be replaced at least every five years and the suspension should be replaced every 1 to 2 years.

When it comes to storing your hard hat, never store it where it is exposed to sunlight because the ultraviolet (UV) rays from the sun can damage and weaken the nonmetallic materials (e.g., plastic). UV damage can be seen on the shell by areas of dullness called chalking. These areas can begin to flake and degrade the surface. Replace your hard hat if chalking exists.

Symptom and Treatment for Head Injuries

The brain is a very fragile organ and floats inside the skull attached by a network of delicate fibers. An impact to the head can cause blood vessels to tear inside the brain resulting in swelling. If a person sustains a head injury that results in unconsciousness, they probably have a brain injury and emergency medical services should be contacted immediately. Never apply pressure to a bleeding head wound because the pressure may push bone fragments into the person’s brain.

If the person is unconscious for only a few minute, they may have a mild concussion but should return to normal function within about 45 minutes. However, evidence of a head injury may not appear for several hours. Therefore, it is important to monitor the victim for 48 hours and contact a physician if you observe any of the ten following signs:

  • Fluid or blooding coming from the nose or ears,
  • Bruising around the eyes or ears,
  • Persistent vomiting,
  • Large or unresponsive pupils,
  • Loss of coordination,
  • Difficulty speaking,
  • Severe and worsening headache,
  • Double vision,
  • Excessive drowsiness, and
  • Convulsions

Resources:

For more information, click on a related personal protective topic below:

Eye Protection for Agricultural Producers

Hearing Loss and Protection for Agricultural Producers

Respiratory Protection for the Farm and Ranch


Use the following format to cite this article:

Head protection for agricultural workers. (2013) Farm and Ranch eXtension in Safety and Health (FReSH) Community of Practice. Retrieved from http://articles.extension.org/pages/69134/head-protection-for-agricultur….

Sources:

American National Standard Institute and International Safety Equipment Association, 2014, ANSI/ISEA Z89.1-2014 – American National Standard for Indus­trial Head Protection, New York, NY. Retrieved from https://safetyequipment.org/standard/ansiisea-z89-1-2014/.

Jepsen, S.D. & Suchy, J. (2015) Head protection. The Ohio State University. Retrieved from http://ohioline.osu.edu/factsheet/aex-7905.

Murphy, D. & Harshman, W. (2012) Head, eye, and foot protection for farm workers. Penn State Extension. Retrieved from https://extension.psu.edu/head-eye-and-foot-protection-for-farm-workers.

Personal protective equipment. (2003) Occupational Safety and Health Administration. Retrieved from http://www.osha.gov/Publications/osha3151.pdf.

Wearing a hard hat is only half the job. (2007) Occupational Health & Safety. Retrieved from http://ohsonline.com/articles/2007/03/wearing-a-hard-hat-is-only-half-th….


Reviewed and Summarized by:
Prosper Doamekpor – Tuskegee University – doamekpor@mytu.tuskegee.edu
Linda M. Fetzer, Pennsylvania State University – lmf8@psu.edu
Dennis J. Murphy, Pennsylvania State University (Has since retired)
Brandon Takacs, West Virginia University – Brandon.Takacs@mail.wvu.edu
Aaron M. Yoder, University of Nebraska Medical Center – aaron.yoder@unmc.edu

Julia Storm

Julia Storm serves as Agromedicine Information Specialist at North Carolina State University and North Carolina Cooperative Extension. She is actively involved in the North Carolina Agromedicine Institute, a partnership of East Carolina University, NC State University and NC A&T State University, whose mission is to promote the health and safety of farmers, foresters, fishers, workers, and their families and communities through research, education, and outreach.

Julia grew up in a small town in East Tennessee. She went to school with classmates who helped their families grow small plots of tobacco and cabbage and raise chickens. One of her vivid childhood memories is of visiting her Sunday school teacher’s family farm and being amazed at the farm chores–especially feeding the hogs. Although she didn’t grow up on a farm, Julia has tremendous respect for farmers, farmworkers, and their families who do the tough and sometimes thankless job of bringing food to our tables. 

College and career brought Julia to North Carolina. Her career has spanned working as an environmental chemist conducting safety and health research on pesticides, to working for a state water quality agency, and finally finding her home as an educator with Cooperative Extension. Her passion is having health and safety research make sense to people in their everyday lives, and helping people adopt practical, sustainable solutions for better health and safe workplaces.

Julia brings this passion, and respect for the people involved in agriculture, to developing engaging educational resources to help farmers and farmworkers stay safe at work. She’s also involved in educational programs for rural health providers who serve the agricultural community. One of Julia’s favorite programs is Certified Safe Farm of NC, a voluntary safety inspection that helps farmers identify safety hazards and provides incentives to help make safety and health improvements. Certified Safe Farm of NC collaborates with AgriSafe of NC to help farmers get occupational health and wellness screenings and set health goals. Efforts are underway to expand these programs statewide. Another favorite project involves a collaboration with Dr. Catherine LePrevost in developing a colorful and interactive pesticide safety training for Spanish-speaking farmworkers, called the Pesticides and Farmworker Health Toolkit.

Julia also enjoys collaborating with colleagues in the South and beyond on initiatives focusing on rural health, serving the Latino community, and cultural competency.

Contact Information

Julia F. Storm, MSPH

Agromedicine Information Specialist

Box 7617, Department of Applied Ecology, NC State University

Raleigh, NC 27695-7617

julia_storm@ncsu.edu